"Boo" Bubbles

There are many things that I do not excel at as a parent. That’s really true of life in general; everyone has things they are really good at and other things they don’t do so well. For example, I am really bad at pretending. Even as a child, I didn’t love playing with dolls and stuffed animals, or making my Barbies talk to each other. And to this day, I really don’t like getting down on the floor and playing those types of things with my kids. I used to think that not wanting to play with my kids made me a bad parent and that my children would seriously lack imagination if I didn’t play with them, but it actually doesn’t mean either of those things are true. Solo play is an important part of developing creative thinking, problem solving and attention span. To be fair, I love spending time with my kids, just not doing that. And I find that I make much more meaningful connections with them when we are all actively engaged in whatever it is we are doing. So, when it comes to certain types of pretend play, my kids are on their own and we find other activities that we enjoy doing together: reading books, playing board games, taking bike rides…

…doing science experiments. I don’t know if it’s that we all just love science, or that they love it because I do; either way we’re here for a good science experiment. And making these “boo bubbles” from Steve Spangler Science was a good one.

Boo bubbles are bubbles that you can hold, bounce, toss and stack. We made them using dry ice, water and a simple bubble solution. Before I get into the details, let me tell you what dry ice is and give some safety tips for working with it.

Dry ice is created by quickly deep-freezing carbon dioxide. In order to keep it frozen, it must be held at sub-zero temperatures, typically around -110 degrees. Because it is so cold, it is unsafe to touch dry ice with your bare skin; doing so can result in severe burns. ALWAYS wear gloves when handling dry ice. Since dry ice is not made from water, it does not melt. That is, as it warms up, it does not become a liquid. Rather, it reverts to its gaseous form- a process called sublimation (if you look at the jar in the photo above, you can see water in the bottom with bubbles and vapor at the top; the bubbles and vapor are the carbon dioxide formed when dry ice sublimates).

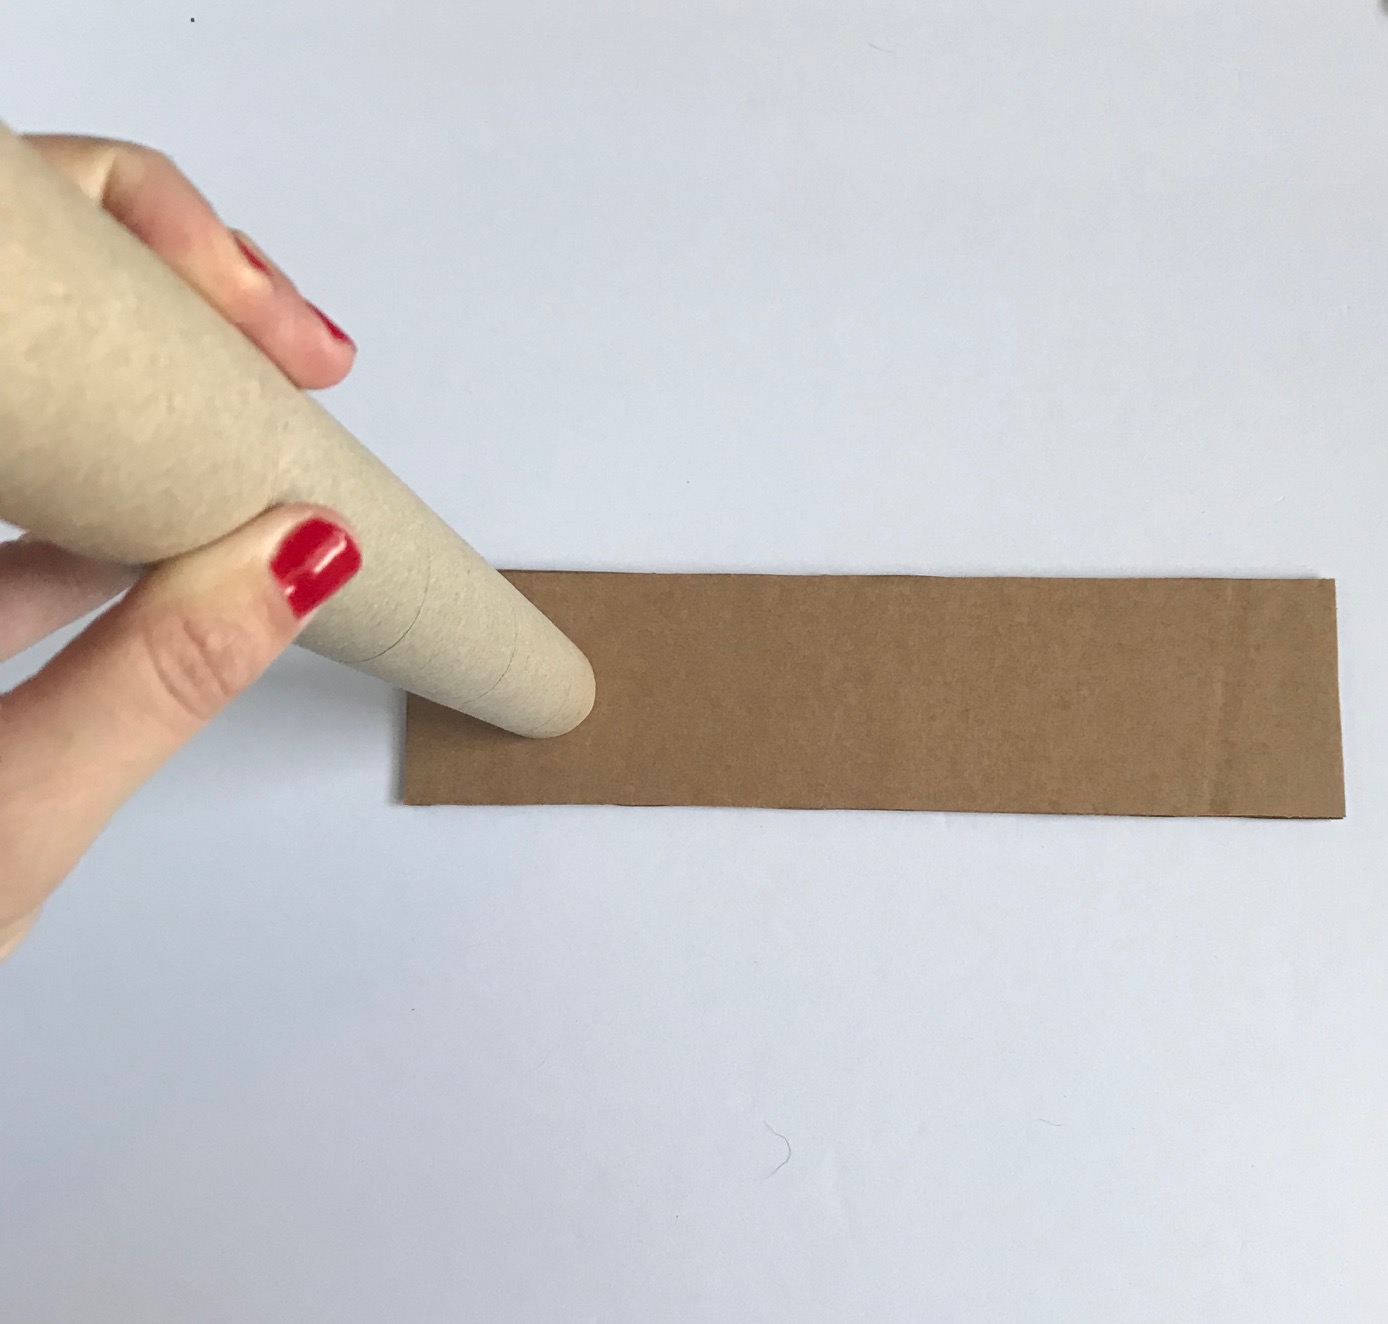
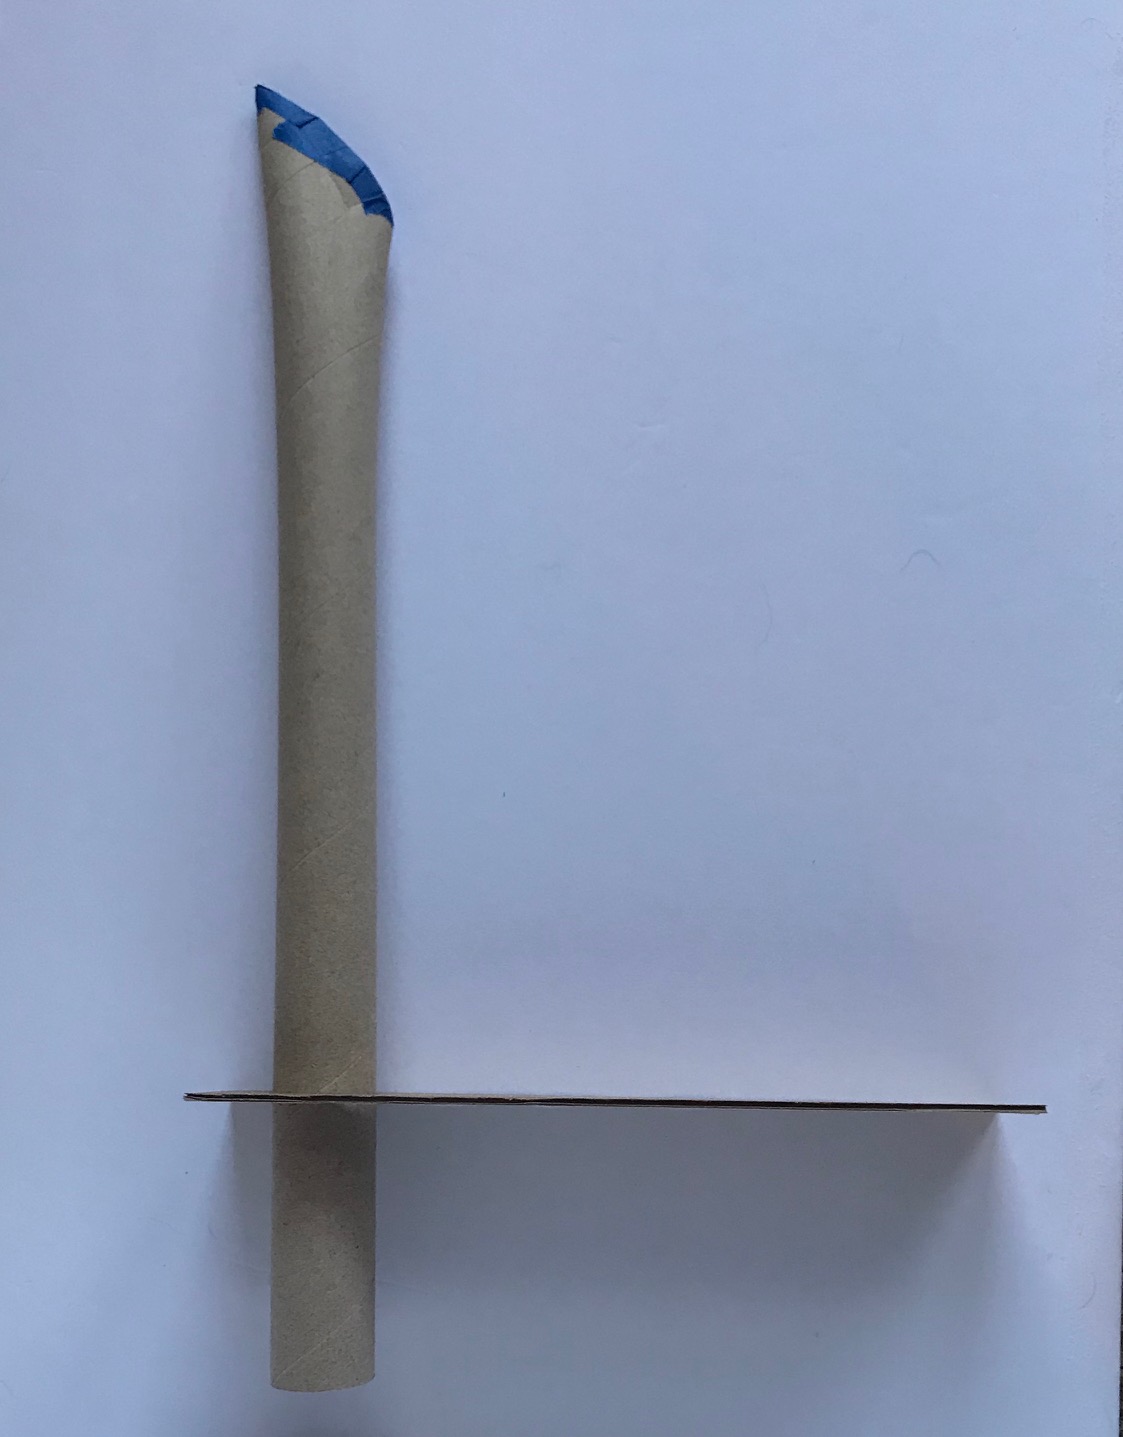
Before we made our bubbles, we talked about the process of sublimation. To observe the difference, we put a piece of dry ice on one plate and a piece of regular ice on another plate and let them sit out while we prepared our experiment. To make our bubble “machine”, we used an empty 1-gallon plastic jar with its lid, some 1/2” clear vinyl tubing, a 1/2” barb x 1/2” adapter fitting, a PVC female adapter, and some plumber’s tape. In the top half of the jar, I cut a hole large enough for the threaded end of the adapter fitting. I wrapped the threaded end with some plumber’s tape and inserted it in the hole, then screwed the female adapter on from inside the jar to hold it in place. I cut a length of the clear tubing- about 4 feet or so- and attached it over the barbed end of the fitting. Then we added a small amount of warm water to the bottom of the jar and created our bubble solution using dish soap and water.

(If you didn’t want to make your own set-up, you could purchase the Boo Bubbles- Dry Ice Smoke Bubbles Experiment kit from Steve Spangler Science.)

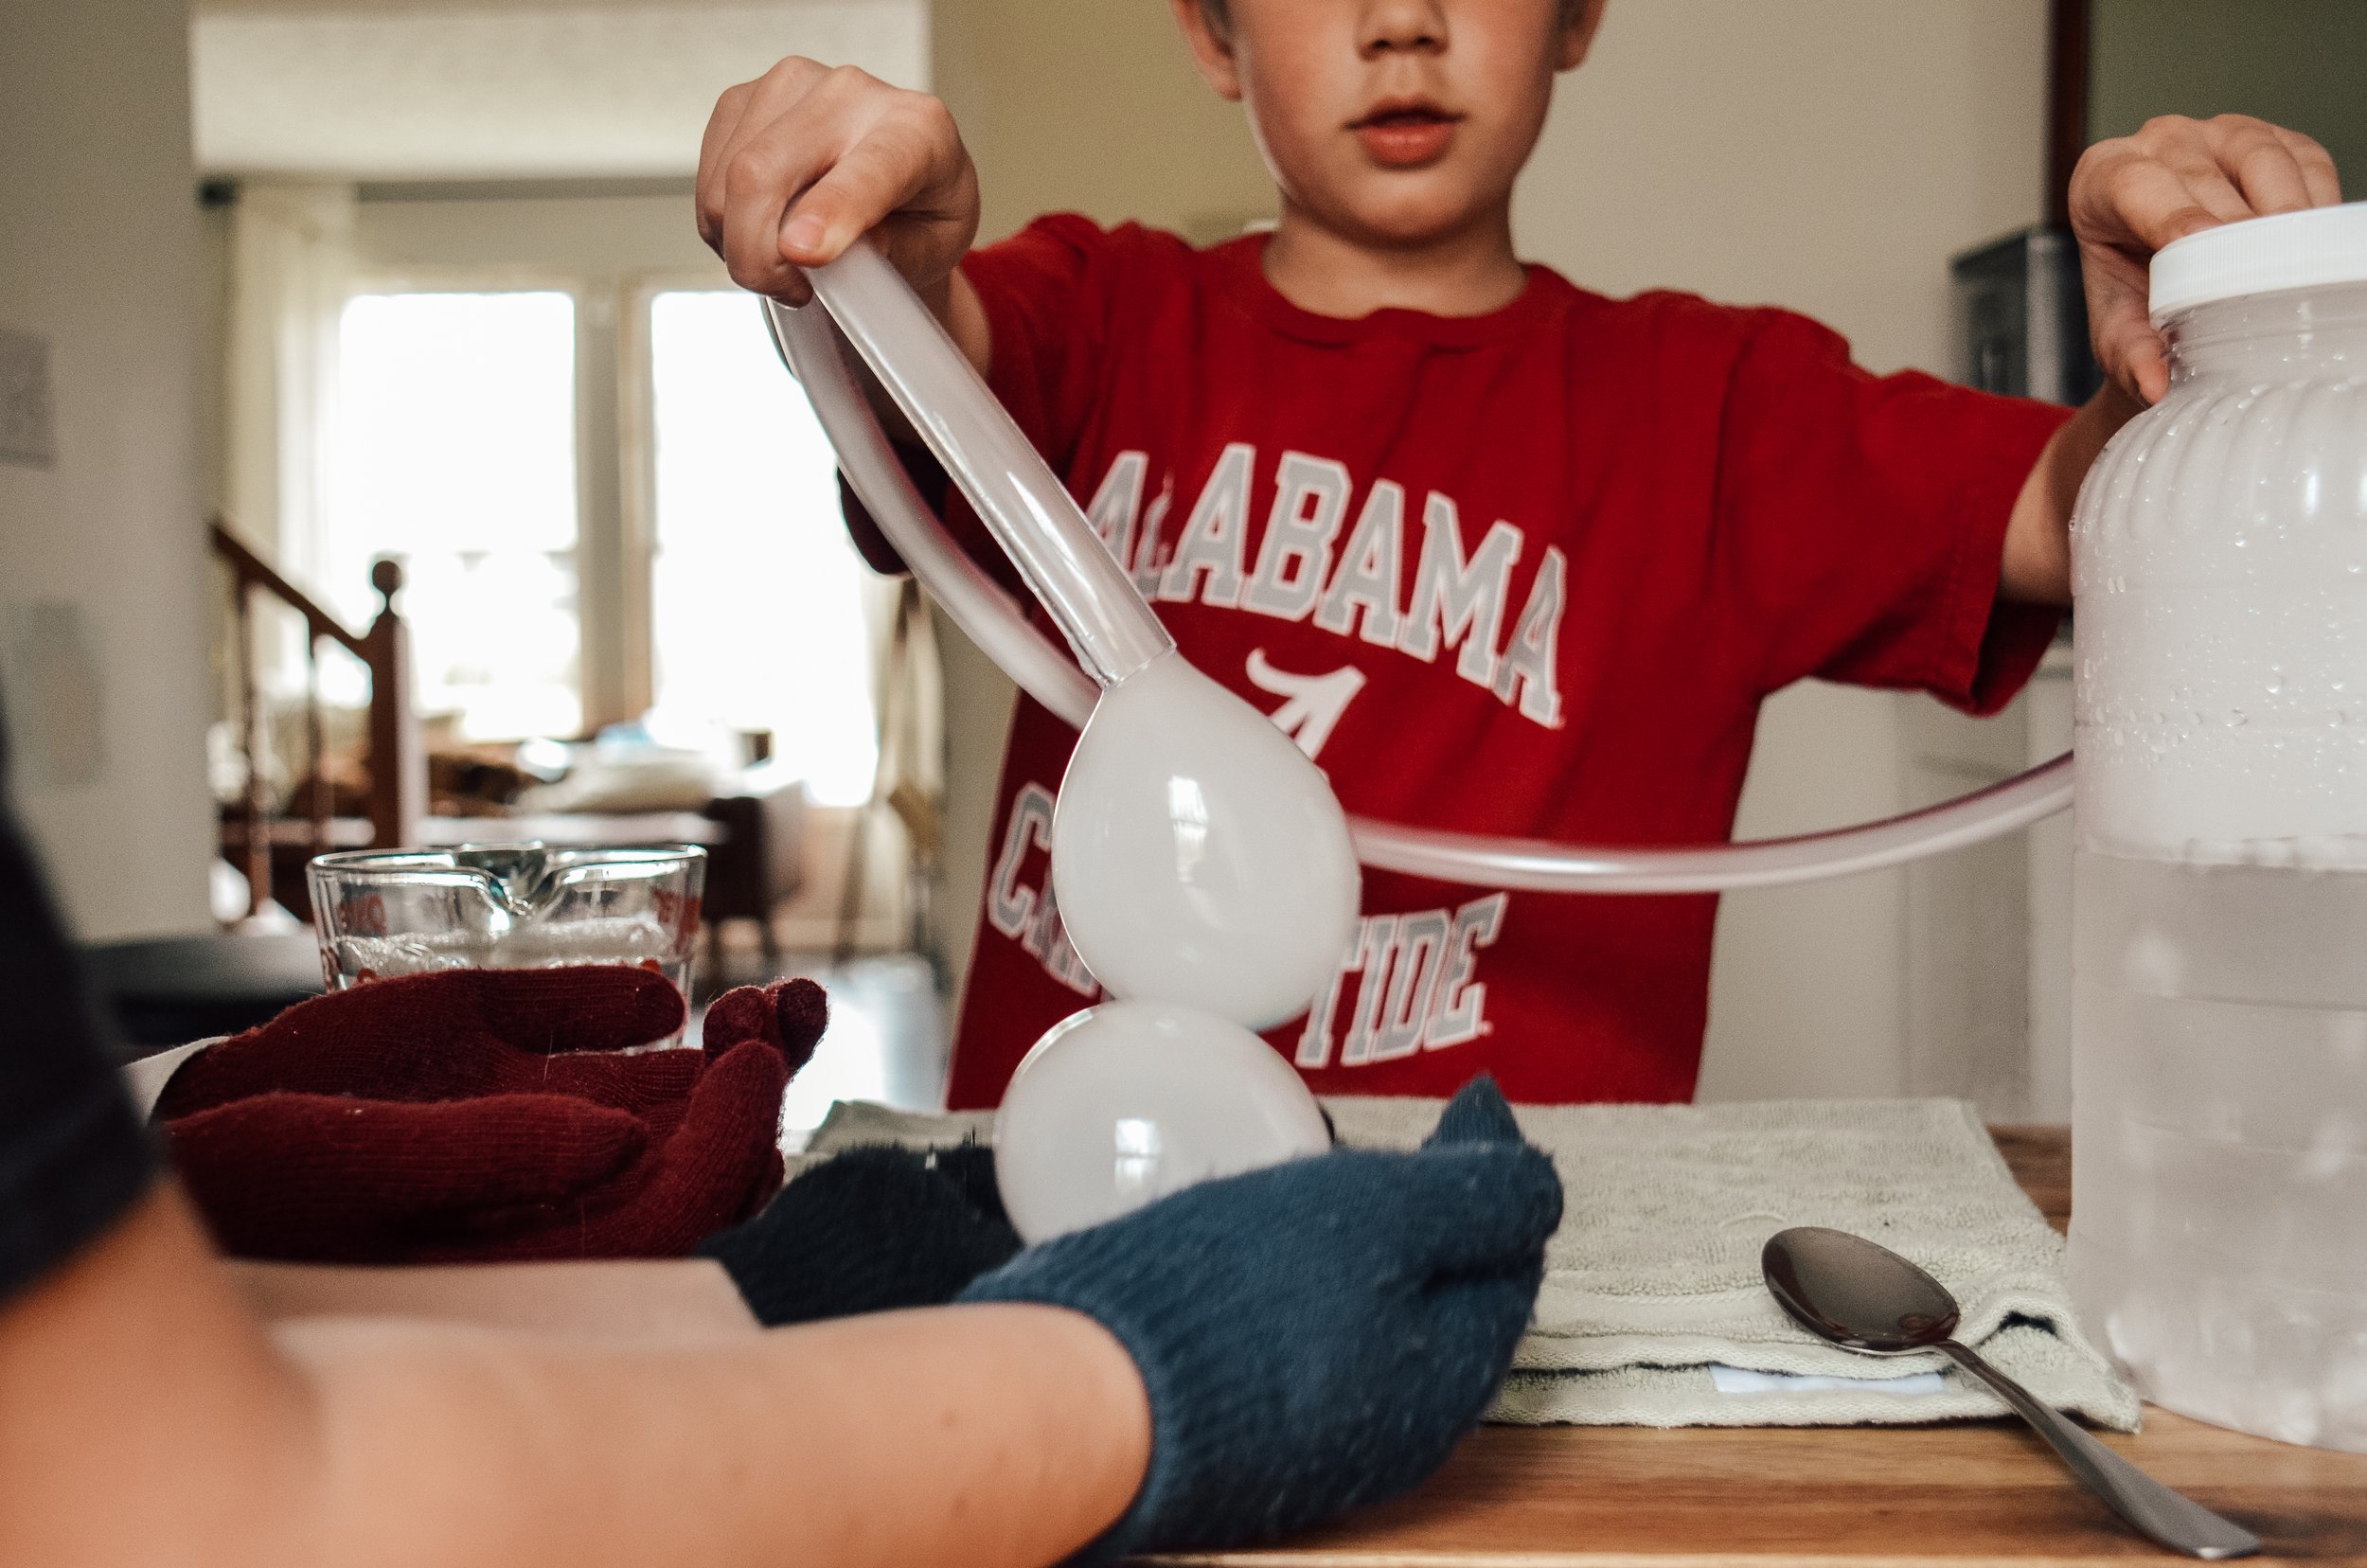
When our materials were ready, we went back and looked at the plates. The plate that originally held a piece of regular ice had a small puddle of water. The plate with the dry ice was dry (as an interesting side note, when we set the dry ice on the plate, we could actually hear the process of sublimation happening; when it came in contact with the warm glass of the plate, the dry ice began to vibrate- a result of the extreme temperature difference). Then we dropped some dry ice in the jar, replaced the lid, dipped the free end our tubing in the bubble solution, and watched the magic happen.

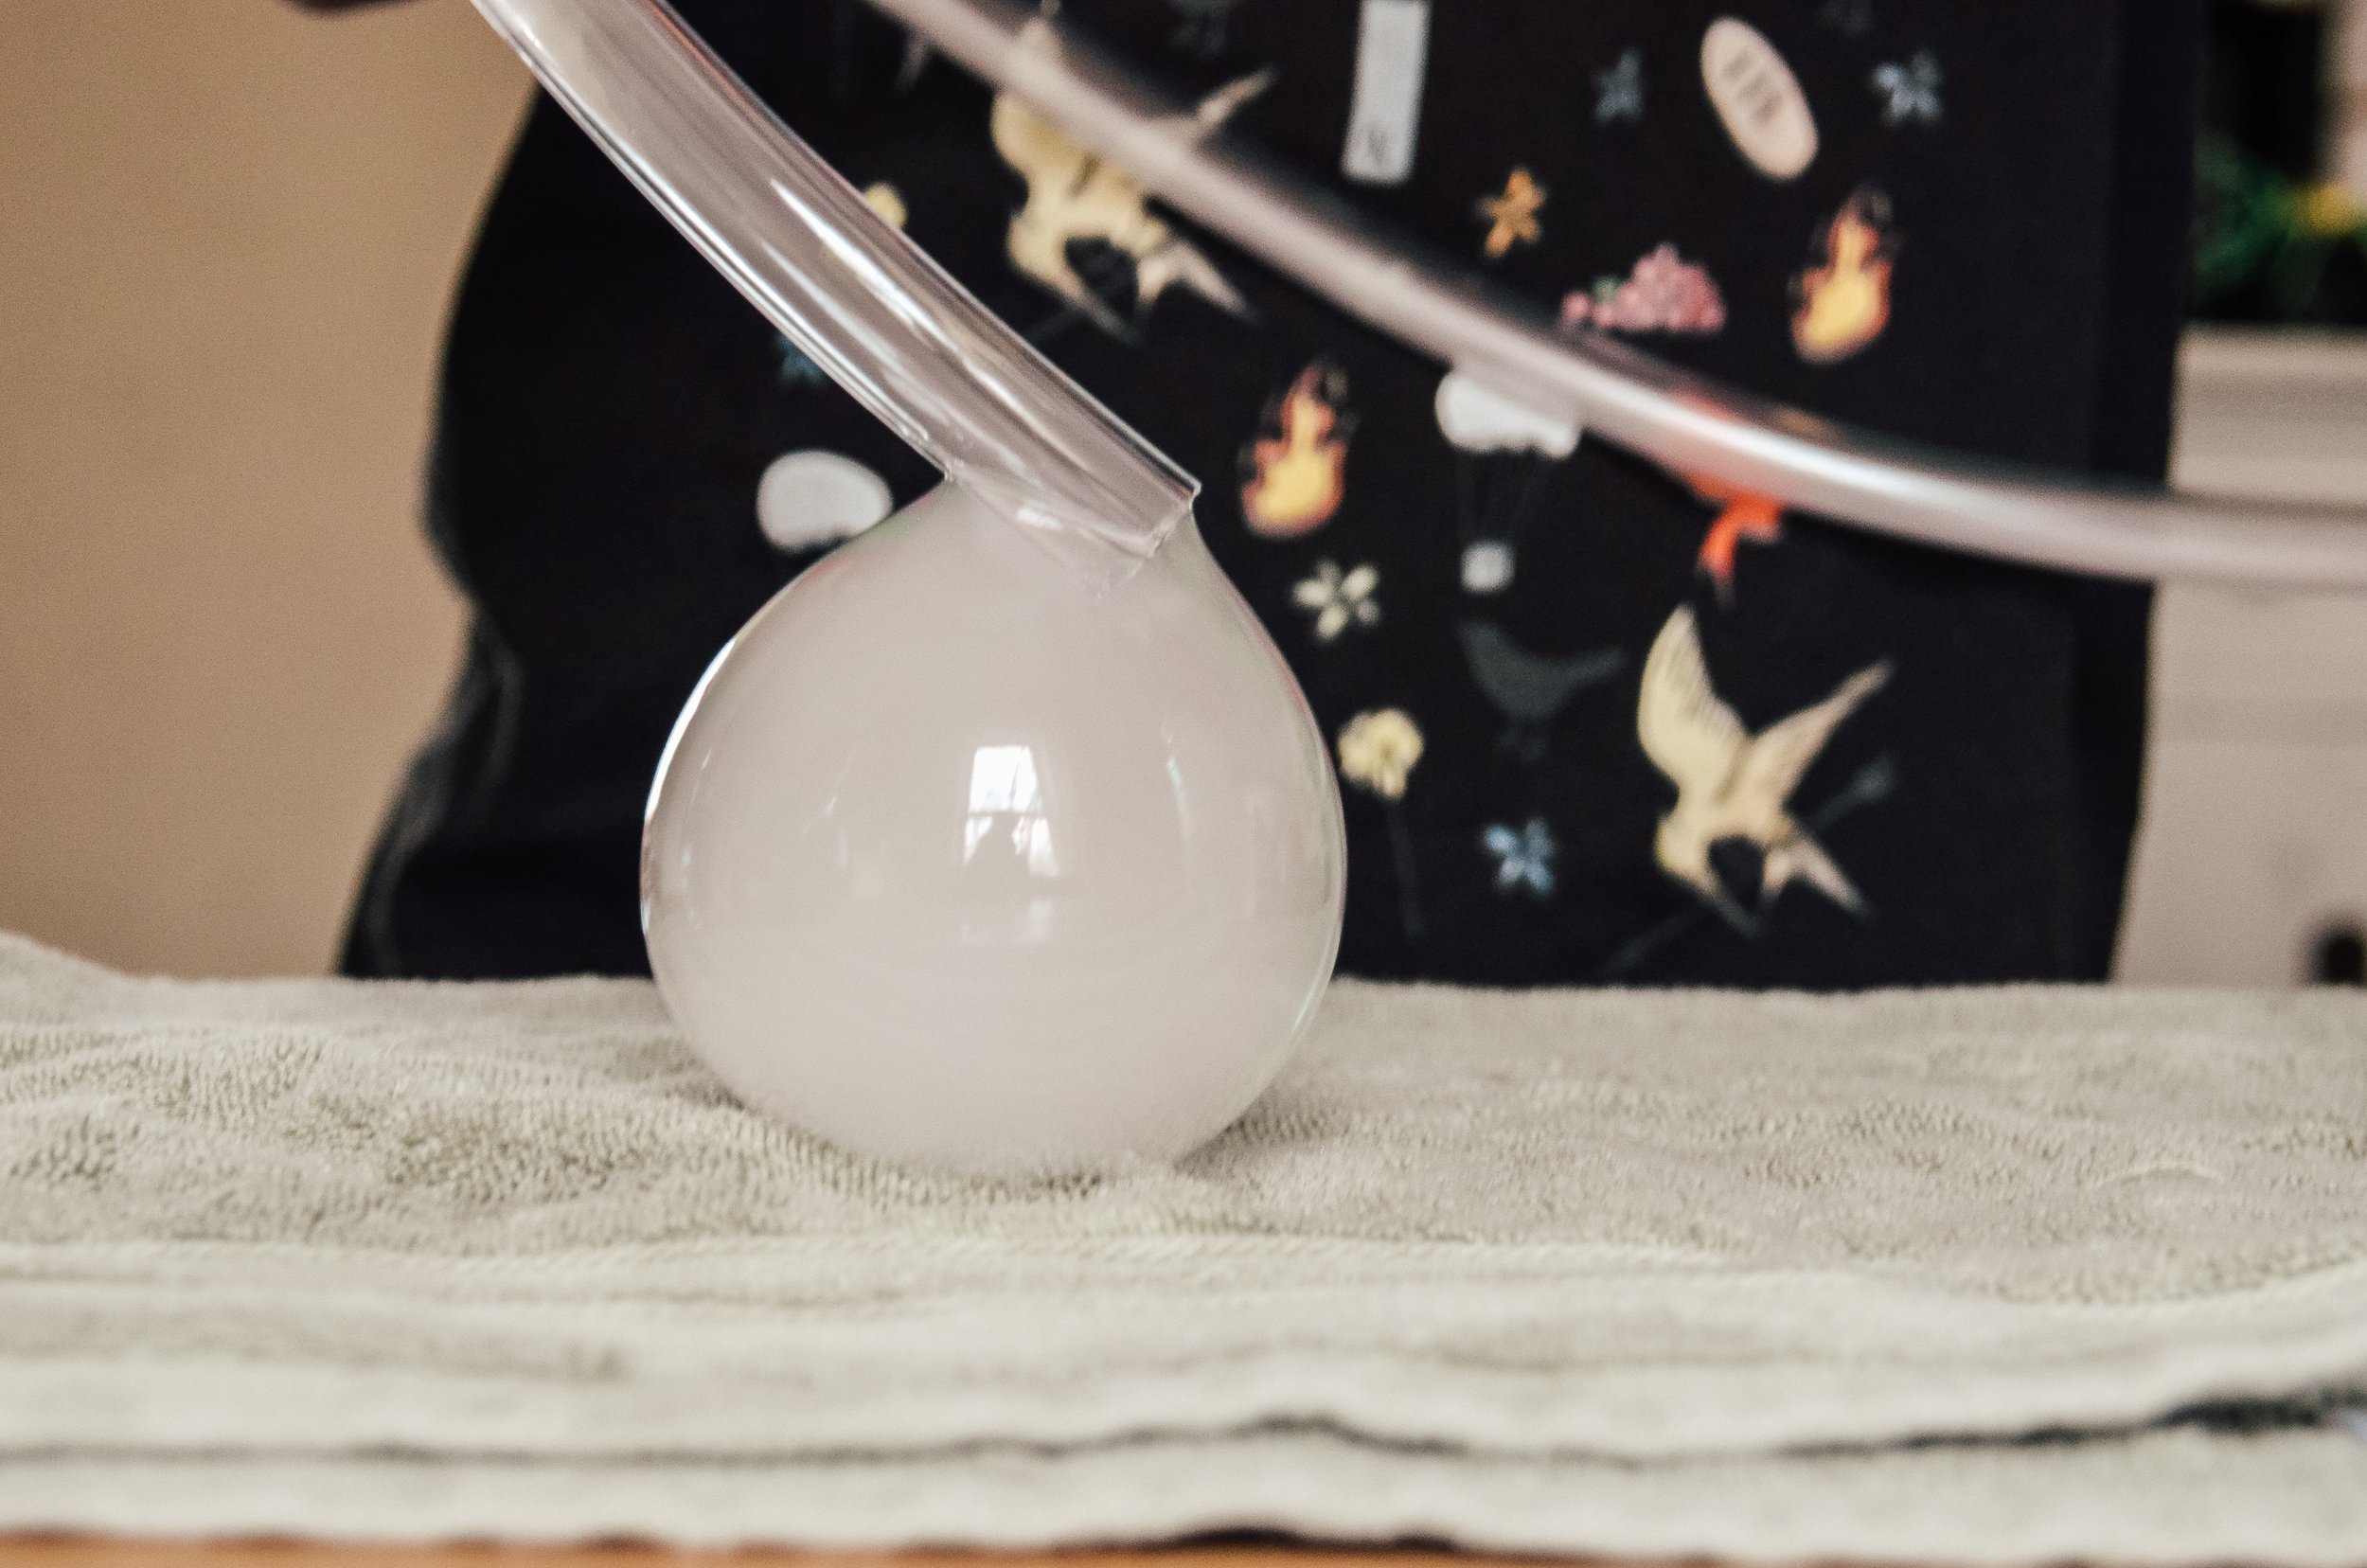
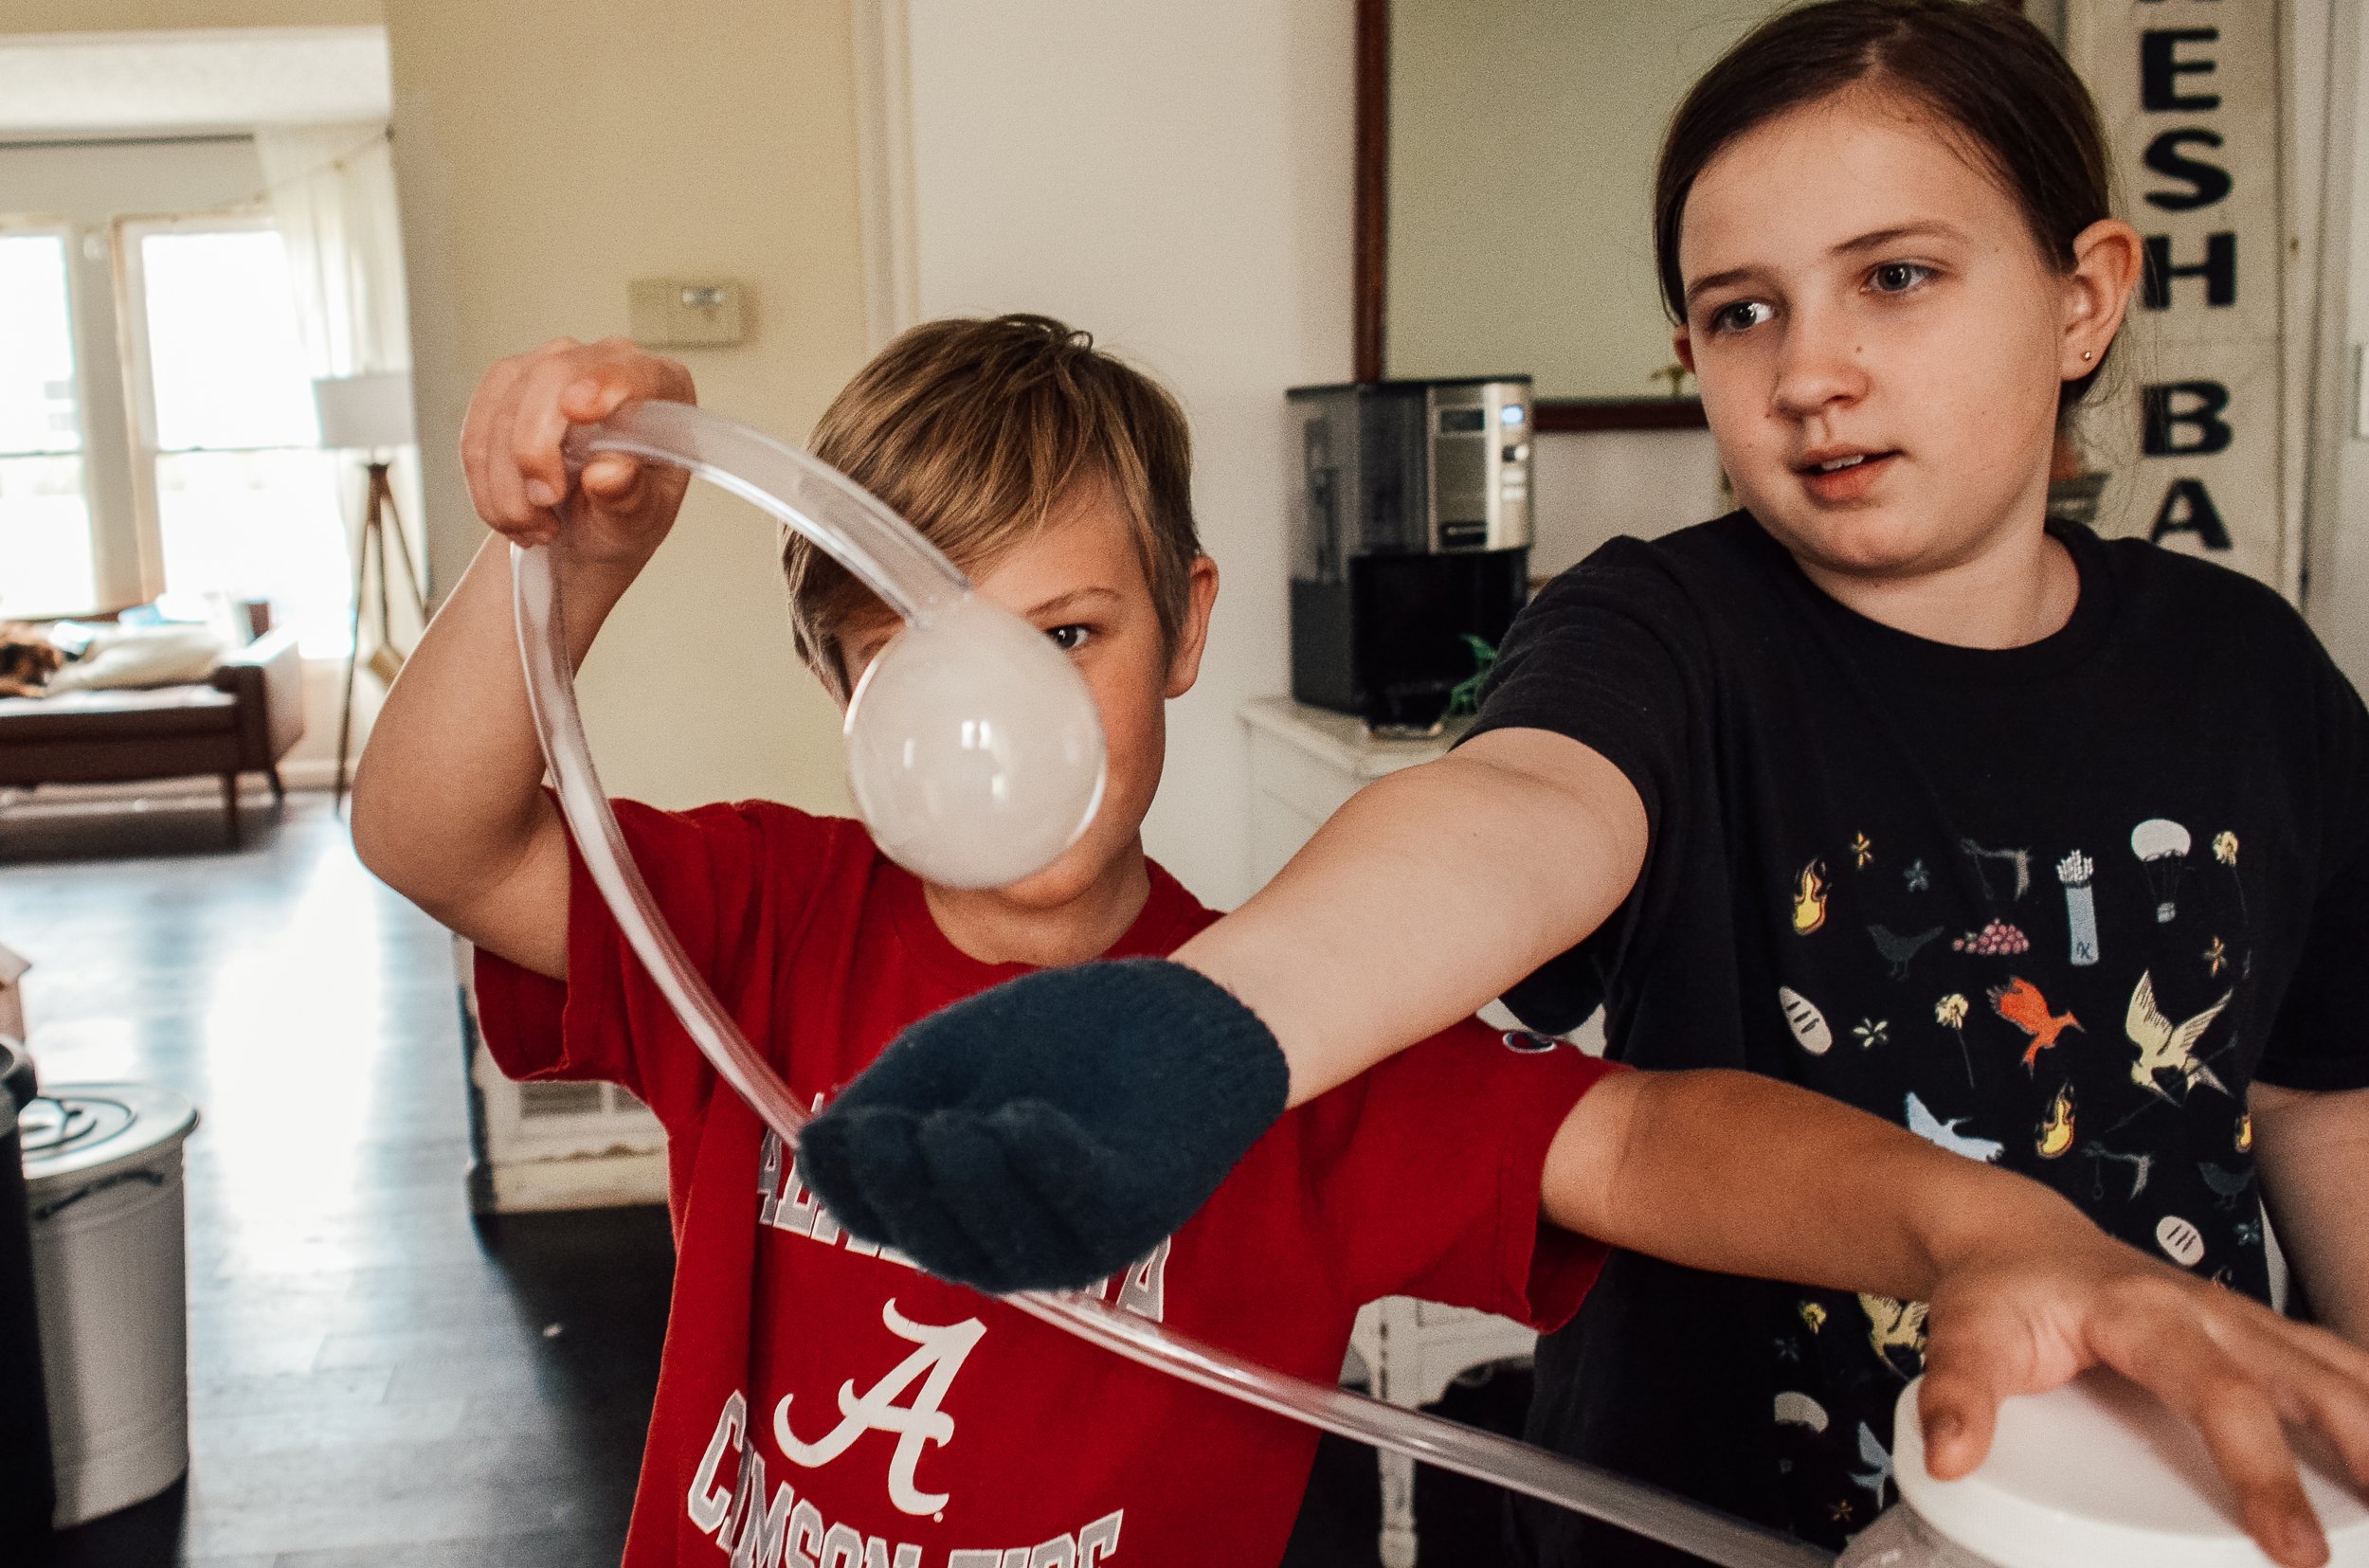
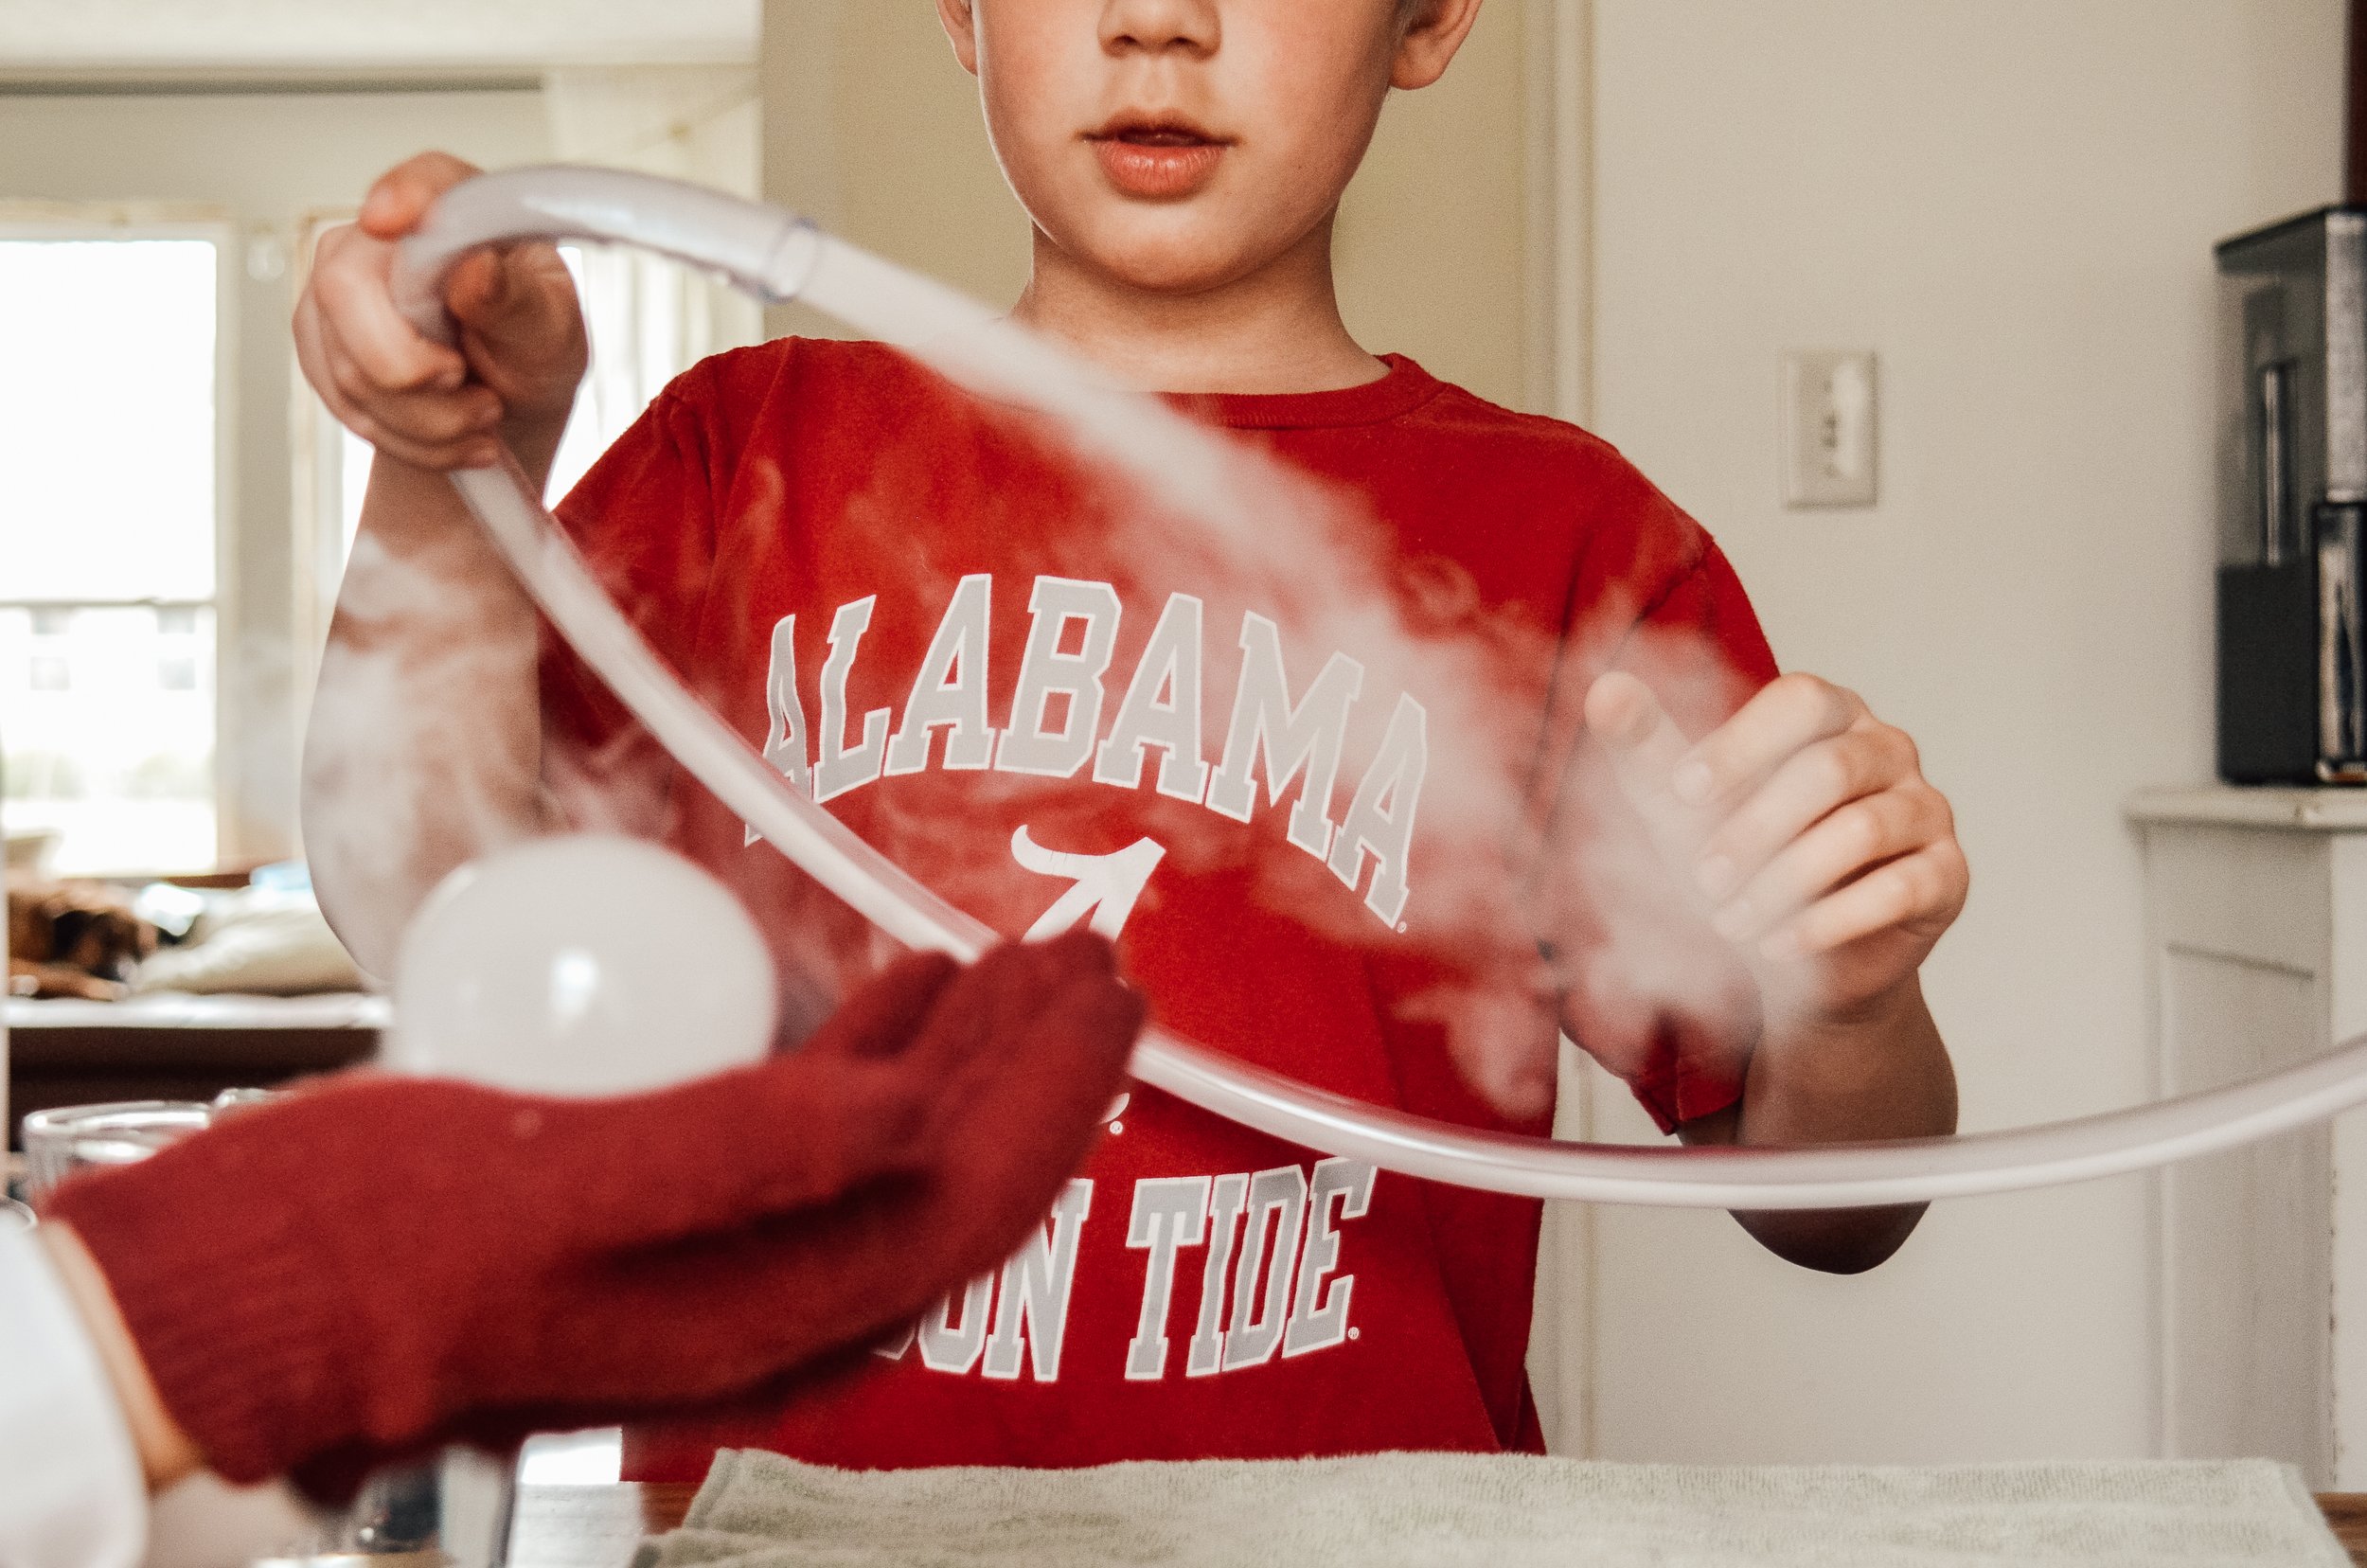
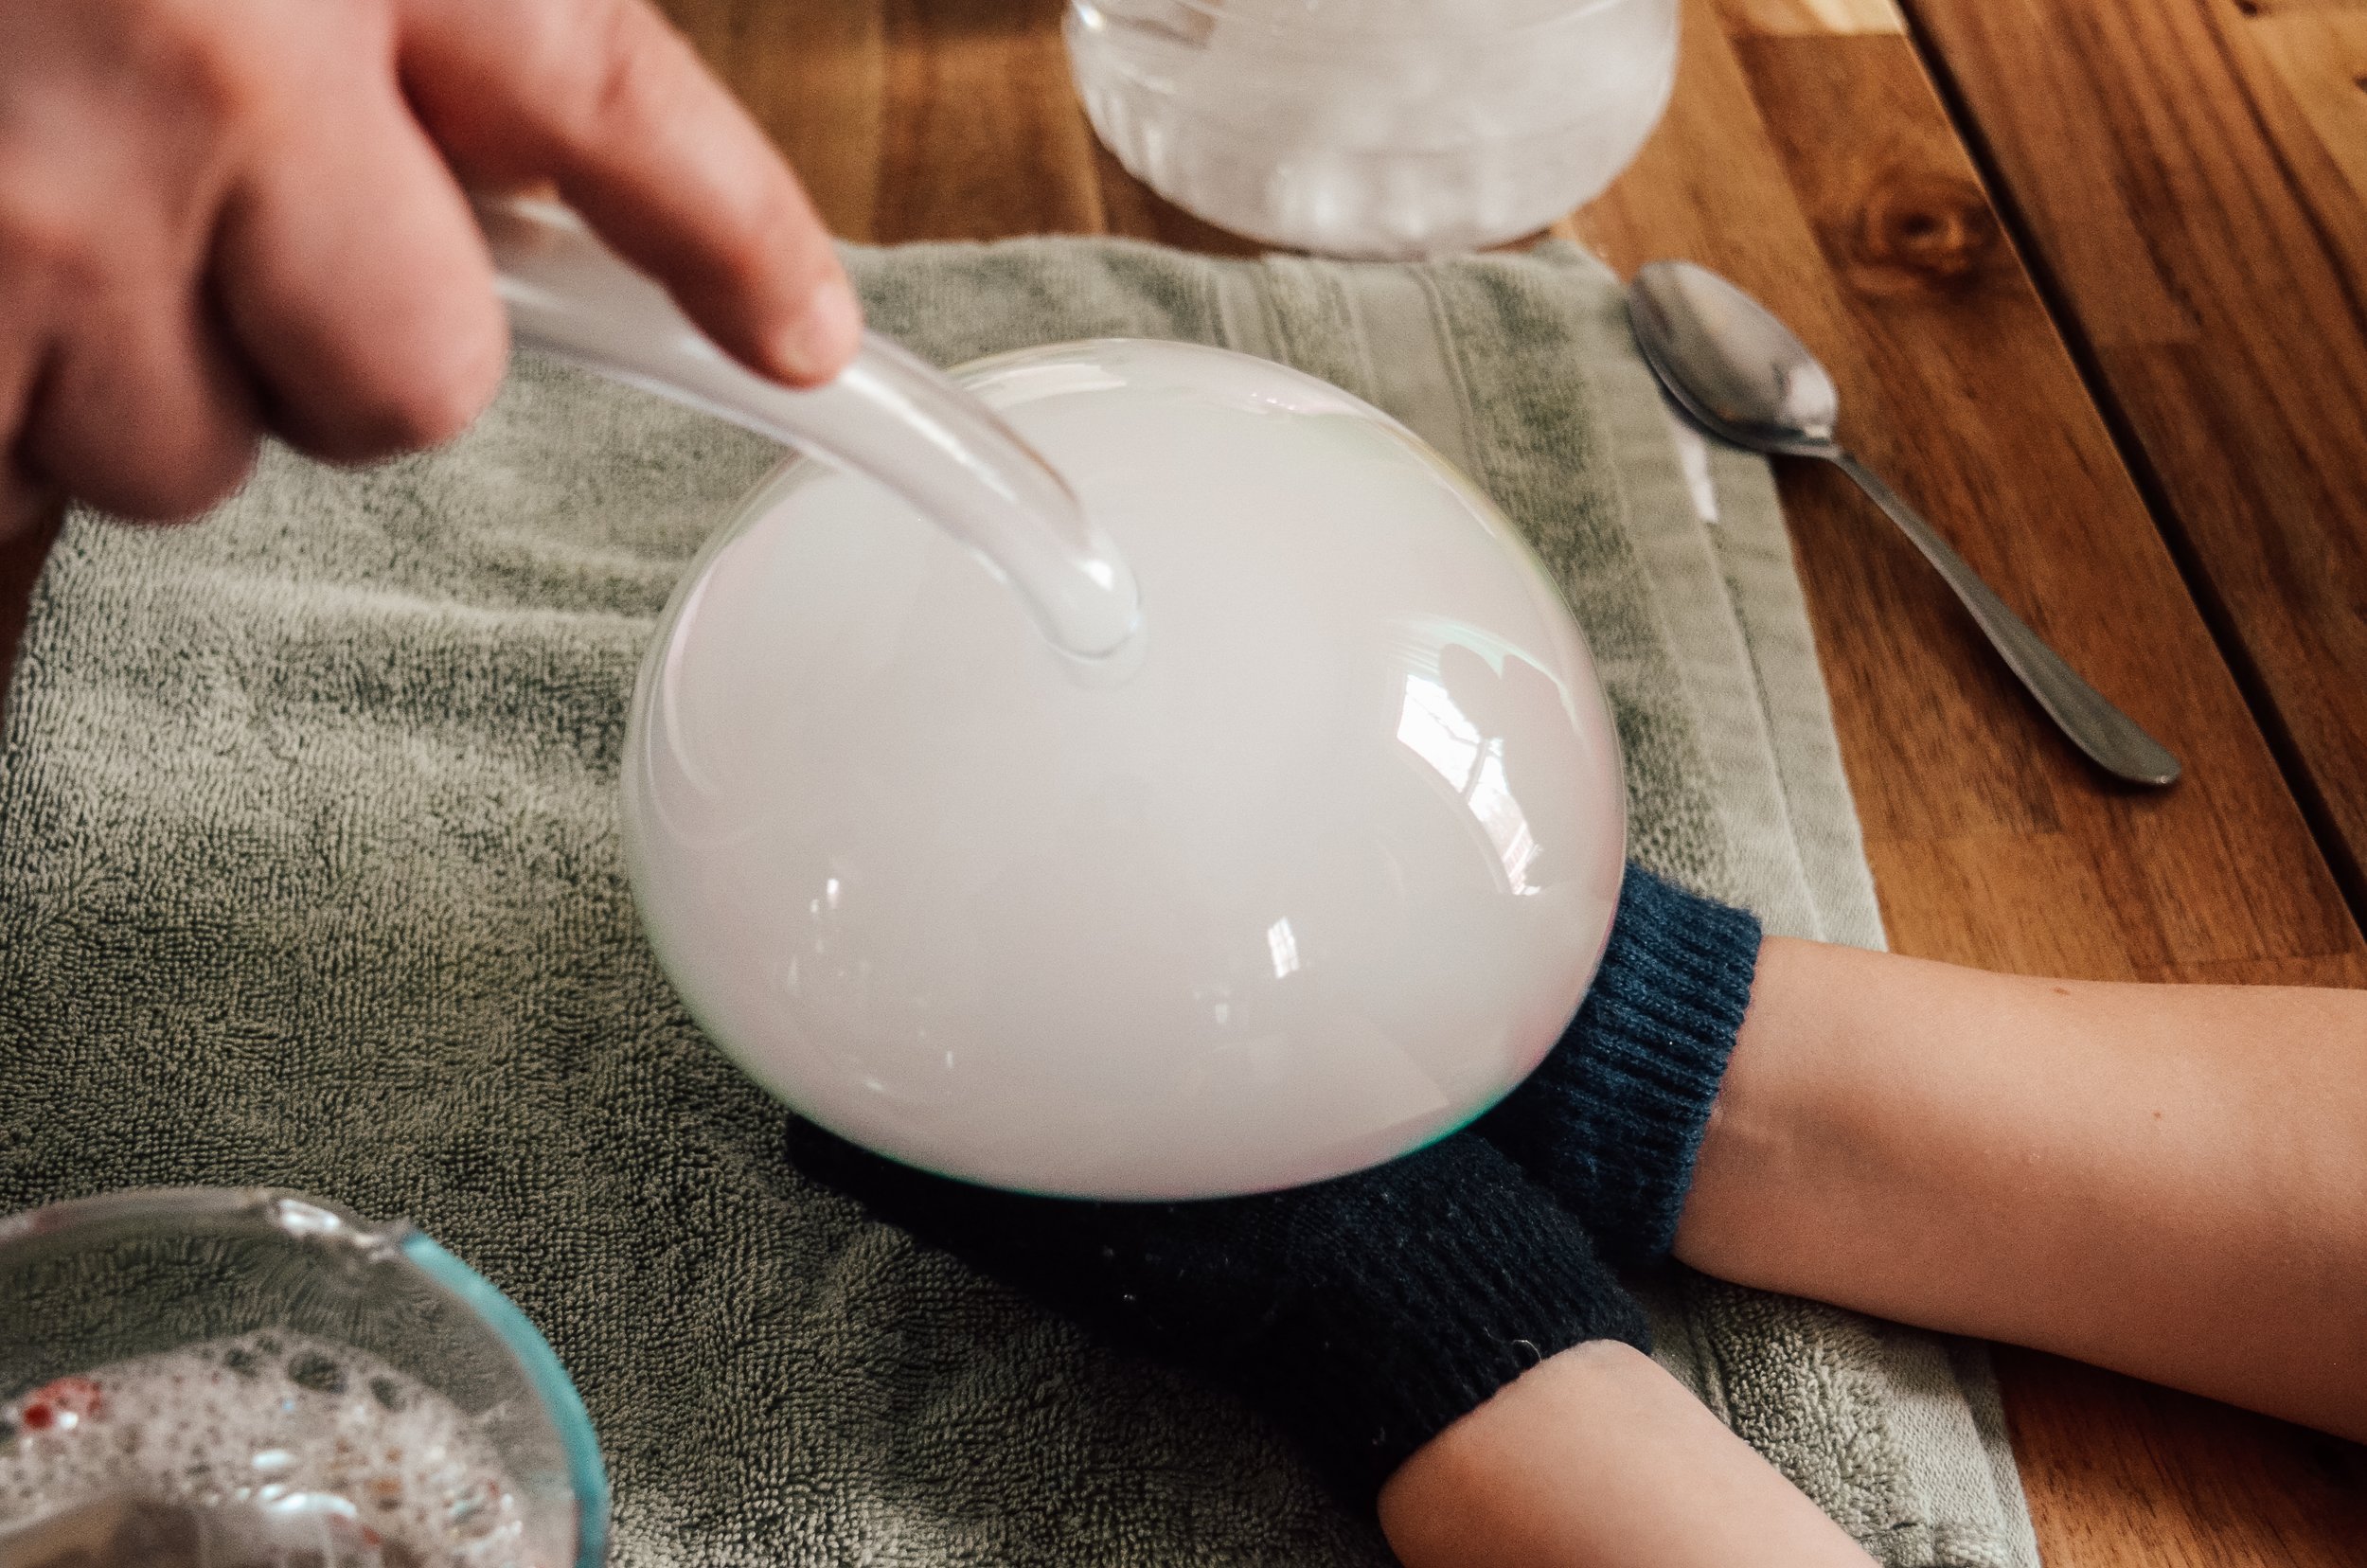
The force of the gas exiting the jar through the tubing causes the bubbles to form, and because the vapor is trapped inside the bubble solution, they appear to be filled with smoke. You can drop the bubbles onto a towel-covered surface, where they will sit until the gas dissipates. They are safe to touch bare-handed, however, the oil on our skin causes them to pop, so if you would like to hold the bubbles, you’ll need to wear some cotton gloves. They can be bounced and tossed gently, and even handed from one person to another if passed off carefully.

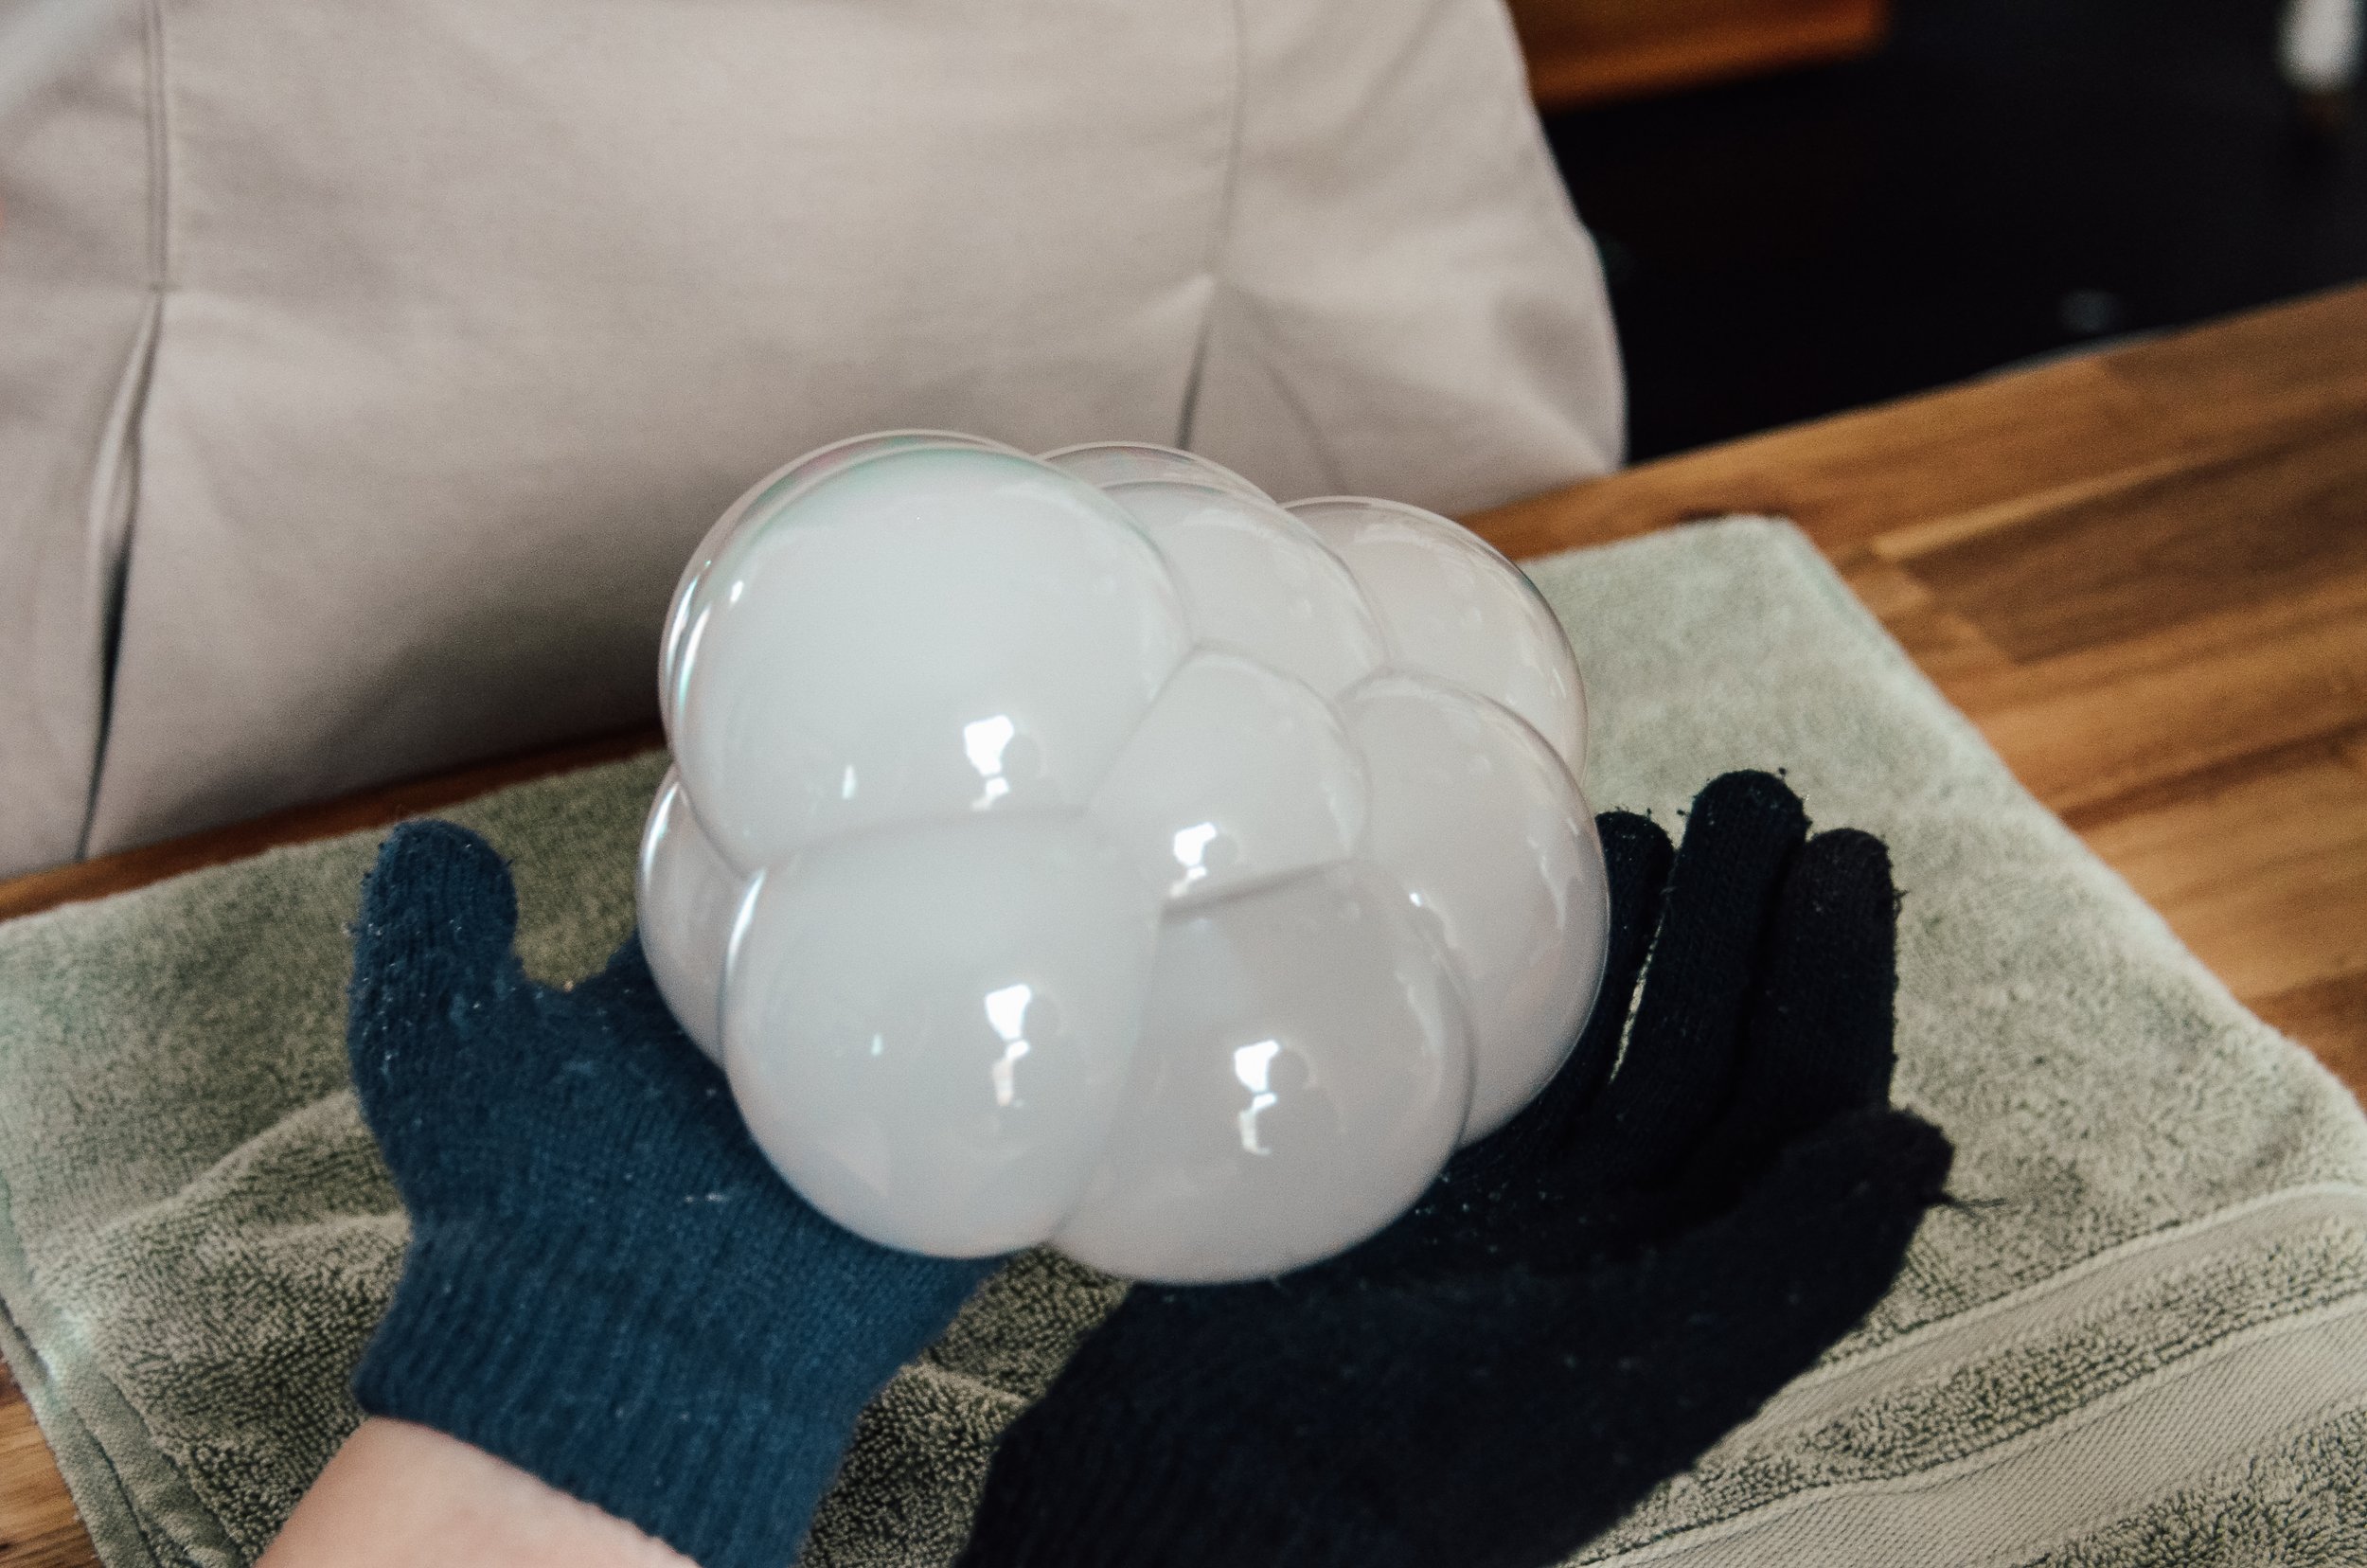
Playing around and experimenting with these bubbles kept us occupied for a long time. Since the dry ice I bought came in pellet form- pieces about the size of a regular ice cube- it sublimated more quickly than a large chunk and we found that as that happened, the pressure of the gas exiting the jar dropped enough that bubbles would no longer form. Every so often, we just added a few more pellets to the jar. We also found that the temperature of the water in the jar affected the rate at which the ice sublimated and, therefore, the pressure, so we did add more warm water a few times and emptied it and added new water once it got too full (you don’t want the water to get too high or the gas will kid of hang out in the jar above the exit point). We had the most fun making piles of bubbles on the table and also forming a bubble within another bubble. It was also really neat to see how the gas would briefly linger in our hands in the shape of a bubble that popped early.

Printable 30-Day LEGO Challenge

My kids recently discovered the LEGO Masters show- have you seen it? Teams of two people are given an unlimited supply of LEGOs and a series of challenges; the winning team gets money, a trophy, and a title. We have quite the LEGO collection around here and even though it already got a lot of use, since they watched the show they’ve started asking me to give them challenges. So, I sat down with our LEGO Ideas Book and used it to help me come up with a list of 30 building challenges for them.

And since we’re all looking for ALL. THE. WAYS. to fight boredom these days, I thought I’d share it here with you.  But first, a quick tip:

We use twin-size fitted sheet to keep LEGO bricks from going everywhere while the kids are using them. And then when they’re done, we can pick up the sheet and dump the bricks right back into their bin.

Click the button below to download the printable PDF. Happy building!

Ice Cream Playdough

Happy summer, friends! It’s the first official day of the season, and you know what that means? ICE CREAM! ALLLLL the ice cream. To be perfectly honest, I can eat- and love- ice cream any time of year, even in the dead of winter, but, really, what is summer without it?

My kids love ice cream just as much as I do, so I decided to add “ice cream” to the list of foods available in our little playroom market. We already had some scoops, sundae cups, and this topping set, so I made two tubs of this ice cream dough (vanilla & chocolate) and added some ceramic “cones”- actually little sundae cups from the Target dollar area (since my kids are a little older, I’m ok with letting them use these ceramic cups for play, but they are breakable, so you could also use paper cones or even real ice cream cones).

Here’s what I love about this playdough: it looks, smells, and ACTS like real ice cream, and it’s taste-safe. Since it’s made out of canned frosting and powdered sugar, it’s perfectly safe if someone acidentally (or accidentally-on purpose) gets a taste of it. The flavoring in the frosting makes it smell just like ice cream. And it scoops perfectly.

To make this “ice cream” you’ll need one 16-oz can of store-bought frosting and about 3-1/2 cups of powdered sugar per flavor. Empty your can of frosting into a bowl and start adding your powdered sugar, mixing as you go. When it gets too hard to mix with a spoon or spatula, knead it with your hands until it no longer sticks to you and reaches the right consistency. You’ll know it’s right because you’ll be able to scoop it just like ice cream. If you accidentally add too much powdered sugar, you can add some cocnut oil or vegetable shortening in small amounts until you’ve softened the dough enough.

Store your playdough in the fridge when not in use (you’ll need to let it soften a little before playing). Remember that this dough IS perishable, so always check for signs of mold before using!

Baking Soda Sensory Snow

A couple of days ago, we had approximately half an inch of snow accumulated on our deck and Theo was determined that we should go outside and build a snowman. Since there was most definitely not enough snow for that, we decided to make some snow “dough” to play with instead.

I found this recipe for baking soda snow and we set about making our own version of it. We’re at the point where I buy giant bags of baking soda to keep on hand for sensory play, so I hauled out my big old 12-lb. bag. We used 12 cups of baking soda to make this big bin of sensory snow.

After mixing it all up, he pulled out the Arctic animals we have in our stash of sensory bin toys. While he was playing with those guys in the snow, I rounded up a little tinker tray of things he could use to make a snowman. I filled the sections of a muffin tin with flannel strips, cinnamon sticks, black beans, pebbles, a bunch of wood pieces (small dowels, wood buttons, etc.), and some bottlebrush trees.

I didn’t bother freezing the snow after we mixed it, but it still felt almost exactly like real snow. It was cool and soft and packable. The only thing we found was that we weren’t able to give our snowman any arms, because sticking the dowels into our snow balls would make them crumble every time. In retrospect, freezing it for a little while probably would have helped hold it together better so our man could have his arms. Or maybe we needed to add a little more water. Either way, we still got a pretty cute snowman!

Two days later, the real snow outside is melting and by tomorrow it will be 50 degrees and seem like we never had any at all, but our inside snow is still going strong. We made it in a bin that no longer has a lid, so it hasn’t been getting covered up when we aren’t playing in it. And even though the top gets a little dry and crusty over night, all we have to do it mix it back up and we have snow again. When we got into it this morning, Theo decided we should add the glitter that we first left out, so now it’s all sparkly, too.

Painted Wood Bead Necklaces

A couple of weeks ago I was looking for a low-prep activity to do with the kids, so I dug out these left over 20-mm wood beads that I had from another project. I let them pick some acrylic paint colors from my stash, threw some smocks on them and let them go to town painting their beads.

When they were done painting them, I threaded them on toothpicks and laid the toothpicks across the mouths of some mason jars so the beads could dry. Acrylic paint dries pretty quickly, so it didn't take long.

Once the beads were dry, I sprayed them with sealant to keep the paint from chipping. Then I gave them their beads, some pony beads for spacers, and some nylon mousetail cord so they could string them onto necklaces.

When they were done, I tied the ends of the cord into a knot, then used a lighter to melt the cord slightly so the knot wouldn't come undone. 

Don't you just love those chunky wood beads? There's just something about them, especially in those cheerful colors, that I love!

Easy "Stained Glass" Sun Catchers

When I was in high school, we had a service requirement to graduate. In my senior year, my best friend and I were volunteering together in a local nursing home, mainly on a floor with Alzheimer's and dementia patients. Up until that point, my interaction with people who needed constant care in that capacity was fairly limited- when I was VERY young we used to visit a second cousin who had cerebral palsy and some other conditions, and I had a great grandmother who suffered from Alzheimers- and I have to admit that it took me very far out of my comfort zone. I think I just had a hard time knowing how to act with the residents- these people so much older than me, but many of them needing to be cared for like children- so I struggled with it so much.

Which is why I think it's great that the fifth grade class at my kids' school spends some time during the school year visiting with the residents at a nursing home/assisted living facility nearby. The kids go 3-4 times over the course of the year to spend time with the residents, and it's really interesting to see the change in their approach to things as the year goes on. Usually on their first visit, most of the students are pretty quiet and unsure of where to go, but by the time they have their last vsit, they've gotten comfortable, both in the facility itself, and with the residents.

Usually, the class brings along some sort of craft or activity to do (so everyone's not just sitting around staring at each other) and they might have a snack or treat, play games, and sing together. And since I am the classroom parent for my daughter's class, her teacher asked me to help with crafts for the kids to do with the residents. This turned out to be harder than it sounds, because they had to be something that didn't take too long, was easy to transport to the facility, could be done by two or 3 people at the same time, and had to be fairly easy in terms of motor skills so that the residents could participate. Oh, and we wanted it to be something fun to display, because the residents would keep them.

My most favorite one was the one we did on their last visit, this spring. These sun catchers were easy for the kids and residents to do together (in most cases the kids handled the glue while the residents chose the color and placement of the tissue paper), and they look so bright and cheery hanging in the windows. The 5th graders really enjoyed makng them, and my 4 & 5 year-old testers had no problem doing them all by themselves, so they are gorgeous and great for any age! And you may already have most of the items at home, but if you don't, you can find all of them at the dollar store.

To make these stained glass suncatchers, you'll need:

Sun Catcher Supplies
  • Tissue paper in various colors (I just bought a package of 24 sheets in multiple colors)
  • Clear plastic plates
  • School glue
  • a small bowl
  • Foam brush of large-ish paint brush
  • Twine, yarn or ribbon
  • Hot glue gun

Pour some glue into your bowl. Working in sections, use the foam brush to paint glue on the top side of the plate.

Easy Stained Glass Sun Catchers

Lay pieces of tissue in a single layer on top of the glue. The pieces of tissue paper can overlap at the edges, but you want to avoid laying too many pieces on top of each other, so the sun can still filter through. 

Easy Stained Glass Sun Catchers

Gently paint a second layer of glue over the tissue paper, smoothing out any bumps or pieces hanging over the edge. Allow to dry. When the glue is dry, hot glue a loop of yarn, twine or ribbon to the back of the plate. Hang in a window that gets lots of sun.

Easy Stained Glass Sun Catchers

When I prepped everything to take to the nursing home, I pre-cut the tissue paper into squares and hot-glued loops of twine to the backs of the plates ahead of time, but you can let the kids do the cutting (or tear the tissue paper), and add your hanger whenever works for you.

How to Set Up a Kids' Art & Homework Area in a Small Space

This post contains affiliate links. If you make a purchase via one of these links, I may receive a small commission at no additional cost to you. All opinions are my own.

It's been gray and rainy all day, and a tornado warning was just issued in our area, so instead of making dinner, the kids and I are huddled up in the playroom in our basement watching Ferdinand (have you seen it? It's seriously so cute!) while we wait for the storm to pass. Since tornado warnings don't typically amount to much more than heavy rain and thunderstorms in our immediate vicinity, I'm not TOO worried, and I thought I'd take this time to share this little area of our house with you.

Here's the thing: our house is pretty small. When we first moved in, it seemed large, but that was 11 years and three kids ago. Despite that, I've tried to designate spaces for the kids where they can do their thing. For the longest time I wanted to have a homework & art space in our house, but it wasn't until were finally able to move the toys out of the living room (which functioned as a play room for many years) and down to the basement that I really felt like we had the space for it. So now we have our playroom in the basement, and we have this little space carved out near my desk for the kids to do homework and make art and do all the things.


DSC_8429.JPG

When I was putting this area together, there were a few things that I wanted to make sure of:

I wanted it to be child-sized. Kids can work so much better when everything fits them and is in reach. I found these industrial kids chairs at the thrift store (originally from Target, but they no longer carry them. Similar ones here). They only had one pair, but I really wish I had another pair for times when we have friends over. Someday, I'll get two more. I purchased the table from Target. I really like this table because a) it was the perfect width for this wall, b) it was rectangular rather than square, which affords the kids more room to work, and c) it helped fulfill my second-most important consideration, which was storage. Because the lid lifts up and I can keep paper and coloring pages and smocks inside it.

DSC_8437.JPG

I wanted to have plenty of storage space in this area. We have tons of art supplies. And I mean TONS. Most of them are stored in bins in the playroom closet, but I wanted to be able to keep some out in this area all the time. AND, I wanted to be able to do it without going cazy, because clutter and mess stress me out. Having the storage table helps. For a while, I had a peg board hanging above it where we hung some of those buckets and the scissors, but all the rest of the supplies were just sitting on the edge of the table by the wall, wasting space. And the hooks kept getting knocked off the pegboard and lost, which drove me crazy. Because it takes forever for us to get projects accomplished, we dealt with that freaking pegboard for... far too long. So, I finally got Josh to help me mount this shelf, and I bought a new hanging bar & hooks (that don't come off!!) from IKEA. Now things don't disappear so easily.

DSC_8416.JPG

I also wanted things to be easily accessible for the kids. Moving the supplies up and off the table made it easer for them to access the items inside it. But I didn't want to move them so far that they would be out of the reach of my four-year-old. We chose to mount the shelf far enough above the table to have room to hang the hooks below it, but still below the hight of the lightswitch so that things were easily within Theo's reach.

IMG_7799.jpg

Finally, I wanted this space to work with the existing space. Because this area is the first thing you see when you walk in our front door, and because it is right next to my workspace, I wanted it to blend easily. I like things to be neat and tidy and well-put together. The industrial chairs and shelving, the galvanized buckets and jars all flow with the overall scheme in our house, so it makes this area kid-friendly without being a mess.

DSC_8422.JPG
DSC_8421.JPG

Some things we keep in this area all the time:

  • crayons
  • markers (fat & thin)
  • colored pencils
  • scissors
  • glue (bottles & sticks)
  • water color pencils
  • palettes & brushes
  • chalk
  • pencils
  • writing paper
  • construction paper
  • coloring pages
  • glitter
  • gems
  • googly eyes

My three younger kids, ages 4, 7, & 10, use this space every day and it functions well for all of them. Having a designated space to work helps to eliminate distractions (like the t.v., which is in our family room, close to our kitchen table) during homework time, and it's really nice to have everything they need right there. Of course, I still have to remind them to clean up and put things away, but having everything right and accessible makes it much easier. 

64 Easter Basket Fillers for Teens, Tweens & Kids

This post contains affiliate links.If you make a purchase using one of these links, I may receive a small commission at no additional cost to you.

You guys. I realized the other day that Easter is THIS.WEEKEND. There I was, humming along, feeling like I have plenty of time to get things done, and suddenly the holiday is six days away and I have NOTHING done. So, one of the things I've been doing over the last few days is searching for basket fillers for my kids.

Unless they have money of their own to spend, there are very few times during the year that my kids get special items, toys, or gifts. Of course, when they are in need of something- clothes, shoes, necessities, we purchase those things. But other than a certain holidays and birthdays, we don't make a lot of special purchases. So instead of filling their Easter baskets with candy, I like to fill them with fun and useful things. I never seem to struggle with ideas for my little ones, but I feel like, as my kids get older, it becomes more difficult to choose good gifts.

Since I'm guessing that lots of other people probably run into this problem, too, I thought I would share with you all the things, just in case you are in need of some last minute items. So, without further ado, here are 64 Easter basket ideas for teens, tweens & kids.


Tween & Teen Girls

Teen & Tween Girls
Tween & Teen Boys
Any Teen
Little Kids
Lego Lovers
Outdoor Play
Art Supplies

7 Fun & Easy Ways to Celebrate St. Patrick's Day With Kids

I know a lot of people think parents are getting a little over-the-top with holiday celebrations. But here's the deal: in our house, we love holidays. Big or small, we celebrate as many of them as we can. My kids get a kick out of all the little things we do, and it's a great opportunity to learn a little bit about the history and/or culture behind the holiday. And we're a little bit Irish and we're Catholic, so here are 7 easy ways to celebrate St. Patrick's Day.

1. Build a leprechaun trap. The first time we ever had a leprechaun trap was when the first grade teacher at our elementary school assigned it to my oldest's class for homework. That was 10 years ago, and we've had at least one in our house every year since. And honestly, when I say build a leprechaun trap, I mean, let your kids do it. Let them raid the art supplies and the recycling pile. Give them glue, glitter, and gold coins (leprechauns love gold, you know). Use legos or blocks or play dough. Let them have at it. This is a great STEAM (that's science, technology, engineering, art, and math, by the way) activity. They can get creative, build, try out different ideas, and see if they work. We've never caught a leprechaun in one of traps, but maybe this year will be different...

DSC_8456.JPG

2. Put together a St. Patrick's Day sensory bin. Kids too little to build a trap? Put together this sensory bin, instead! The dollar store has all things green and lots of cheap St. Patrick's Day trinkets. Grab a couple bags of green paper shred (or Easter grass), some foam shamrocks and other green things, and some fake gold coins and toss them in a bin. My kids love digging through the grass and finding all the hidden things.

DSC_8141.JPG

3. Eat Lucky Charms cereal. No, this isn't an ad for the cereal. In fact, since I typically don't feed my kids cereal full of marshmallows for breakfast, I generally don't buy it. But, once a year, we have it in our house and it's a big treat for them.

4. Make a walking rainbow. If you've ever done this, you know what a cool experiment it is! You need 6 clear jars/glasses/cups, paper towels, some water, and red, blue and yellow food coloring. Put the jars in a circle and fill every other jar about 1/2 to 3/4 full of water. Add red food coloring to the first jar of water, yellow to the second jar of water, and blue to the third. Fold 6 paper towels into strips and put them between the jars, one end in each. Make sure the ones in the water jars are touching the water. Let them sit. Check them every once in a while to see the colors climbing the paper towels between jars. After several hours, you will have an entire rainbow, like magic!

IMG_4893.JPG
IMG_7635.JPG

5. Go On a Gold Hunt. Gather some fake gold coins, pennies, or anything you can find that is yellow. Hide them around your house and send your kids on a "gold hunt". Make it more interesting by setting a timer and seeing how many pieces they can find before it goes off. Of make it a race, seeing who can collect the most pieces of gold. Or have them team up to help each other.

DSC_8447.JPG

6. Bless someone else with "the luck o' the Irish". Take some time to leave a treat for a neighbor or someone you love. Leave a card with it explaining that a leprechaun has blessed them with some luck. There is never a bad time to teach kids to show kindness to others.

7. Make a little mischief. Leprechauns love mischief! They might take things out and put them away in the wrong place, steal the gold out of a trap without being caught and hide it around the house, or leave a fun little note about why they are so hard to catch.


Winter Boredom Buster: DIY Cardboard Tube Swords

Well, its that time of year again. Christmas and the New Year have come and gone, and we're digging for the cold winter months. Winter came into our area full-force over Christmas and I have a feeling we're going to be spending a lot of time cooped up inside over the next few months. Which means that I'm going to be looking for lots of ways to stave off boredom and keep my kids from fighting over EVERY. LITTLE. THING. Because, let's be honest, short days + cold weather + being stuck inside = cranky kids (and mom & dad, too). So, hopefully, over the next days/weeks/months, I'll be sharing with you easy crafts and activities to help keep the boredom at bay.

Today I'm going to share with you a quick tutorial on how to make these cardboard swords. I actually made these for an event I did at work in early December, and had extras that I passed on to my kids. They go together pretty quickly and my kids have played with them quite a bit over the last few weeks. If you're like me, you'll even have leftover cardboard boxes and wrapping paper tubes from Christmas, which makes these super easy to do!


IMG_5128.jpg

For the swords, you will need:

  • Cardboard tubes- when I made these for work, I raided my wrapping paper, unrolling the rolls that had only a little bit of paper left, and stealing the tubes inside. Now, I have some more tubes from Christmas wrapping, but if you didn't just happen to save them to add to your ever-growing stash of cardboard like me, fear not! You can make cardboard tubes by scoring a rectangle of thin-ish cardboard, rolling it up, and hot glueing the edge.
  • Pencil
  • Masking tape (I couldn't find my masking tape, so I used blue painter's tape, instead).

Not Pictured:

  • A piece of thin-ish flat cardboard- like the side of a box, or an empty cereal box.
  • Craft knife
  • Hot glue gun
  • Foil (optional)
  • Markers/gems/glue/paint/decorations (also optional)

It's going to look like there are a lot of steps to making these swords, but that's because I wanted to break them WAAAY down to make them really easy, so don't worry, and don't feel overwhelmed!

  1. If your cardboard tubes are long, trim off the end to your desired length. I probably made mine about 24 inches.
  2. Flatten one end slightly and cut a curved edge (be careful to round out the top point a little bit so that it isn't TOO sharp; some of mine were actually sharper than I wanted and I had to go back and round them off some more):
IMG_5129.jpg
IMG_5130.jpg


        3. Tape off this edge with masking tape:

IMG_5131.jpg

        4. If you would like to cover the blade with foil to make it look more like a sword, now is the               time. Simply wrap pieces of foil around it (if you want, you can hot glue them to give them             more staying power). I left my swords uncovered for two reasons: a) I was worried the foil            would give them too sharp of an edge and b) I was giving kids free reign to decorate them            as they chose.

       5. On your flat piece of cardboard, draw one rectangle per sword. I made mine 3x12 inches,                but you can make any size you want as long as they are wider than the width of your                      sword blade. These will be the hand guards. Cut out using your craft knife:

IMG_5132.jpg

        6. On the left side of the hand guard, trace the bottom round edge of your blade and cut it                 out with your craft knife.

IMG_5136.jpg

       7. Slide hand guard up over the bottom of the blade. Make sure the hand guard is extending             out to the right, and that the curved edge of the blade is facing the same direction:

       8. Bend right side of hand guard down, forming a "D" shape, and hot glue to the bottom of                the blade. Hold for a few seconds to make sure the hot glue dries:

IMG_5141.jpg

       9. Let your kids decorate them with paint, markers, gems, etc. (this keeps them occupied                    longer!), and when they are dry, they are ready to sword fight!

Just a note about safety- before letting my kids play with these swords, we talked about making sure that they were hitting SWORDS ONLY, not people, so no one got hurt.

And that's it! My kids have spent several hours sword-fighting, playing pretend, and just generally enjoying their swords!