Valentine's Day Mini Pull-String Piñata
Hi, Everybody! Thanks for stopping by today! I'm putting together a fun little surprise for my kids for Valentine's Day this year and I thought I'd share a little bit about it with you!
I love to give my kids fun and thoughtful little gifts, and I'm all about the packaging, so this year I'm making these small pull-string piñatas for them. My kids span a pretty wide age-range (4-15 1/2), so the plan for these is to fill them with some fun small gifts and let them break them open on Valentine's Day, but I also think that these would make a really great box for a kiddo to collect valentines in at school. How cool would it be to let your friends and classmates fill up your piñata, and then break it open when you get home?! So, if you have a school-ager, consider helping him or her make one to take to school if they celebrate Valentine's Day! Or, you could make an even smaller version and fill it with candy, or stickers, or even confetti... lots of possibilities here ;)
Ok, on to the tutorial. First- a disclaimer. This is going to look like a REALLLLY long job, but it actually comes together fairly quickly. I took lots of pictures and am trying to be very clear in my directions so that I don't confuse anyone! Here we go!
Tools and Materials:
8 ½ x 11 sheet of paper
Cardboard
Masking Tape
Heavy brown craft paper OR very thin cardboard (like a cereal box)
Tissue Paper
Regular old school glue
Embroidery/large needle
Twine/yarn/string of some sort
Scissors
Craft knife
Pencil
What To Do:
Create a heart template: fold your piece of paper in half so that it is now 8 ½ x 5 ½. Trace one half of a heart on the fold and cut out. Unfold your heart and lay in on your cardboard; trace 2 and cut using your craft knife (it's a good idea to put a spare piece of cardboard underneath where you are cutting to protect your work surface).


Set hearts aside. Cut 2- 4 ½ inch wide strips from your cardboard (if you are making a smaller piñata, I would use narrower strips). I cut mine from a tri-fold board I purchased at the dollar store, so they were approximately 24 inches long, but the length you need will depend on how large your heart is. I purposely cut mine long so that I could trim them down where needed.

Gently bend your cardboard strips to help make them more flexible.

Sorry about the glare! It was hard to get a good picture of this on my table!
Beginning at the top center of, attach one of your hearts to the top edge of one cardboard strip. Use lots of tape! Stop taping about 2 inches from the bottom point of your heart (1 inch for smaller piñatas). Trim off your cardboard strip so that you will have an opening at the bottom of the piñata.
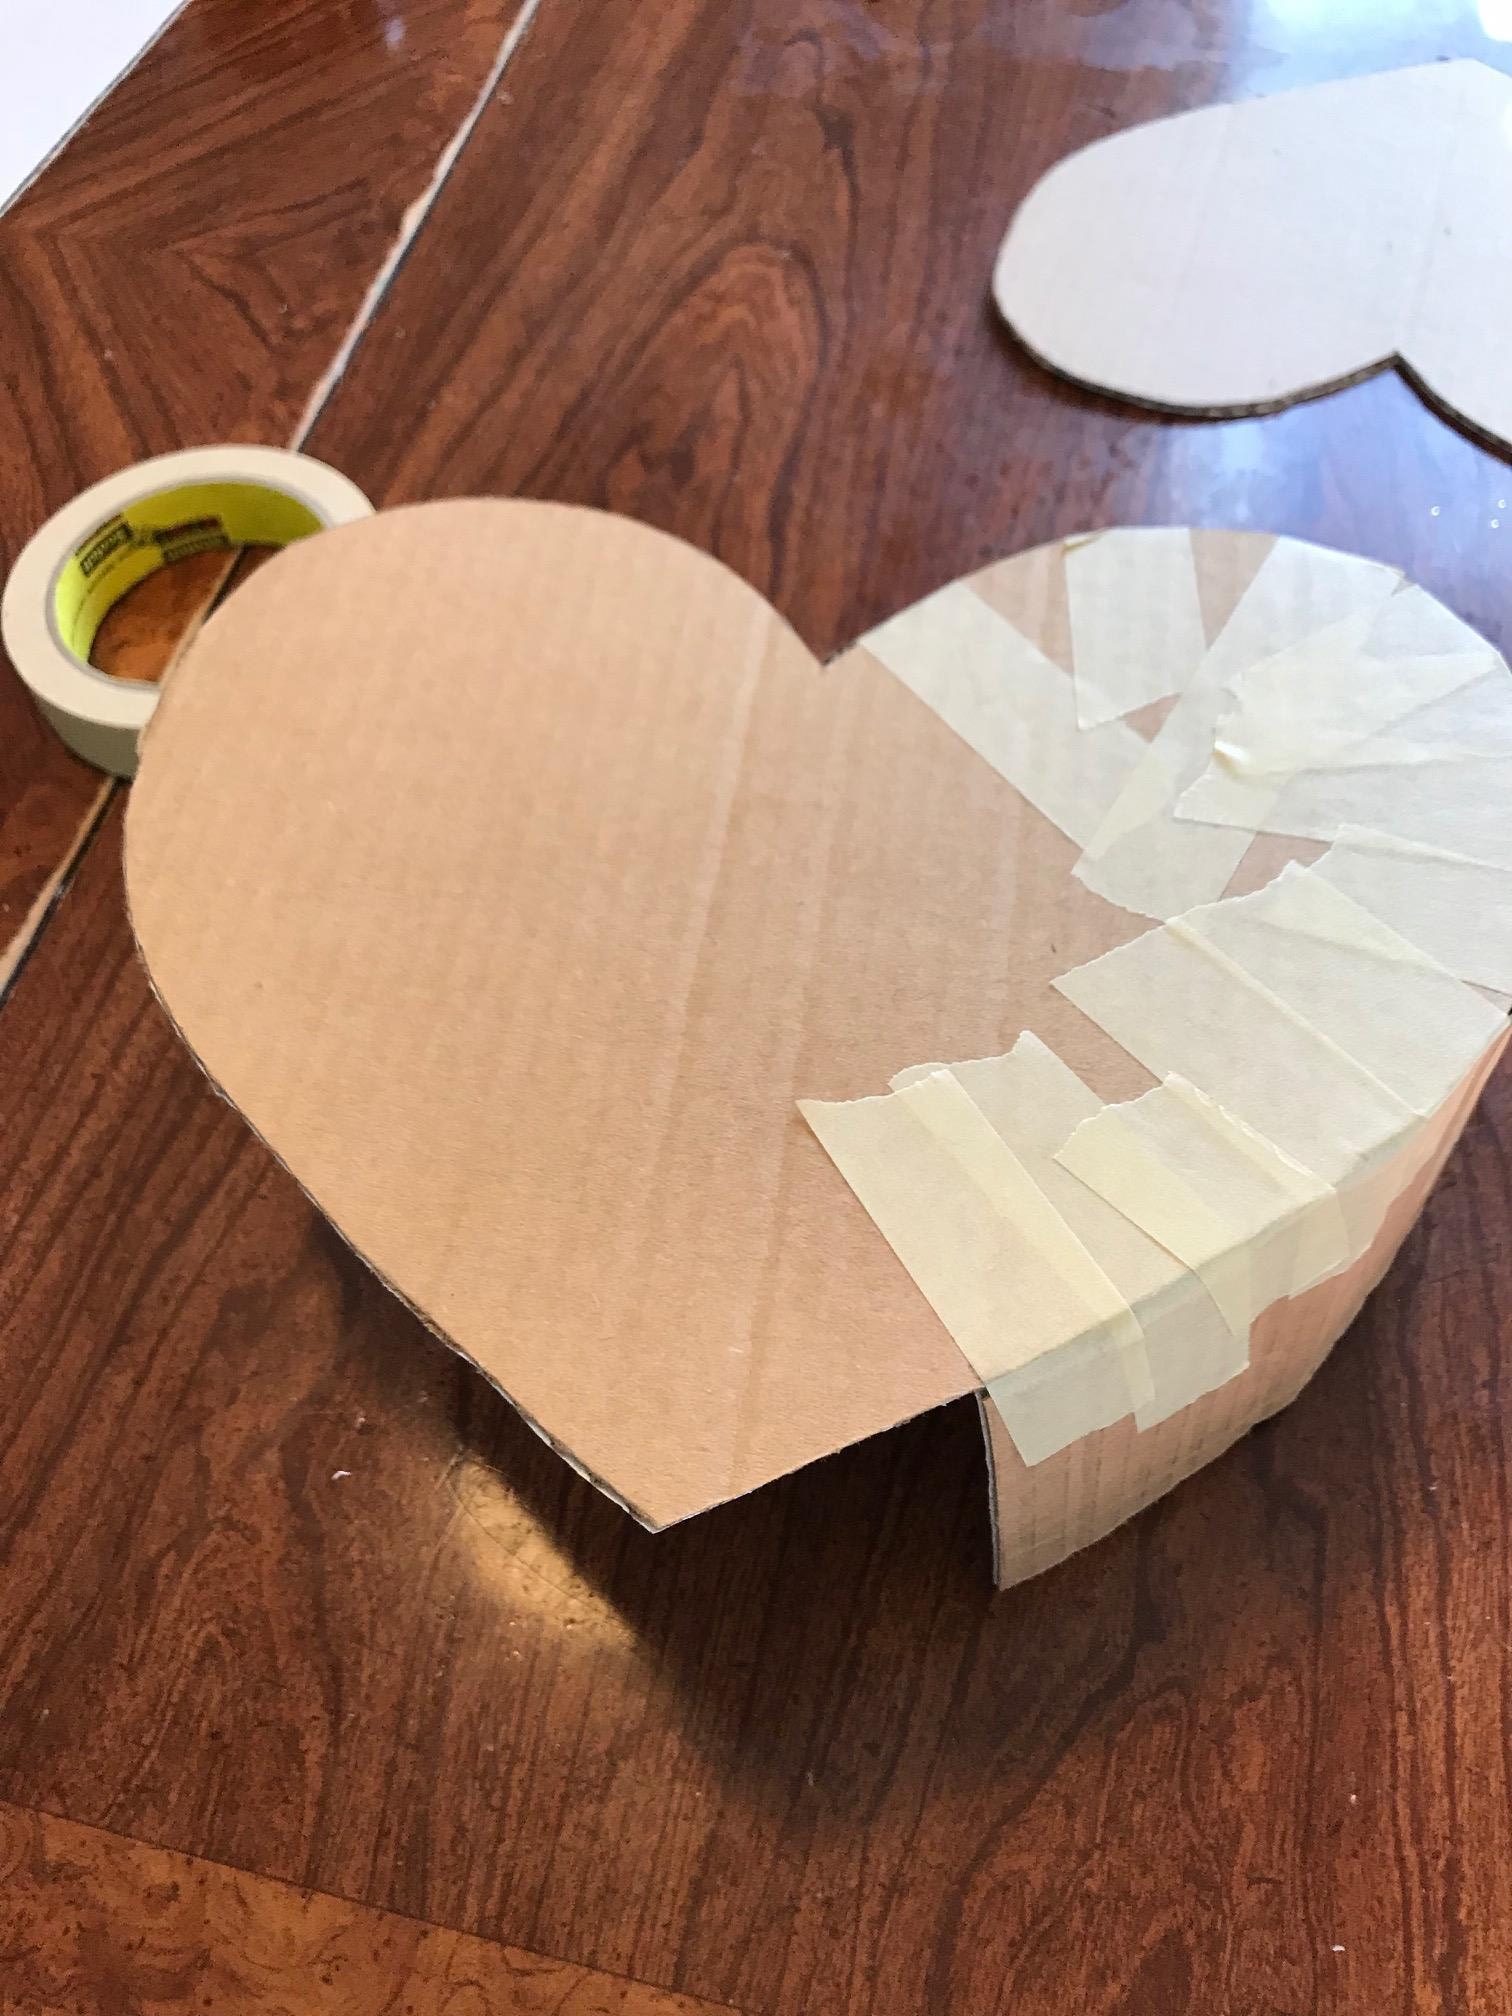
Reinforce the outside of the seam with masking tape. Tape the seam on the inside of your piñata if you wish.

On the other side of your heart, measure up 2 inches from the center point (1 inch for smaller piñatas) and mark. Line up one edge of your second cardboard strip with this mark and tape it to the heart the same way you did on the first side. STOP taping about 2 ¼ inches away from the top center point. Trim off your cardboard strip where it meets the center point on the top of your heart (this will be your flap to open for filling the piñata). Tape inside if you wish. Reinforce the outer seam with masking tape as before.

Flip the piñata over so the front heart is on your work surface with sides sticking up. Lay your second heart on top, lining up edges and points. Tape in the same manner as first side. Don’t forget to reinforce those edges!
Cut a 6 x 5 ½ piece of your heavy craft paper (or cereal box). Mark a line 1 inch in from each long edge. Fold in half length-wise with lines on the inside. Make a good crease- this will become the bottom point of your heart. Open the paper up and fold the long edges in to meet the lines you drew.


Thread your needle with a length of twine. Push the needle up through the bottom of the craft paper at the crease. Pull the end of the end of the twine out of the needle’s eye and knot well (I tied mine about 5 times in the same place). You should now have the knot between the folds of the paper, with the string hanging from the point of your heart.


Fold the paper back in half and insert it into the bottom of your piñata, lining the crease up with the bottom point and the fold of the long edges up with the sides of the piñata. Tape into place on the outside.

Time to cover your piñata (I promise, we’re almost done)! Cut a bunch of 2 inch wide (1- 1 ½ for smaller piñatas) strips of tissue paper. Stack your strips on top of each other and cut fringe along the bottom edge.

Now, here’s where I’m going to tell you to do look at the pictures for reference, but also ignore them. I made the mistake of starting on the outer edge of my heart and then covering the front and back. It worked, but would have been a lot less difficult if I had started with the front & back and then done the edge. So. Do as I say. Not as I… did.
Starting at the bottom point of the piñata, you are going to layer your fringe strips on top of each other, making sure to over lap so no cardboard is showing. I glued the top edge of each strip about 1/8th to 1/4 of an inch above the top edge of the previous strip. I also found it helpful to glue the first few layers so that they followed the shape of the bottom point. Then, just lay the strips straight across, trimming off any excess length. When you get to the top, be sure to tuck the strips in around the center of your heart so you maintain the shape!

When your front and back are covered, then cover the sides, starting at the bottom on either side of your point and working your way up to the center. If you need to, once your whole piñata is covered, give your fringe a little haircut to make it nice and even & emphasize the shape!

Bottom is to the right in this photo- see the pull string?

LAST STEP! Cut 2 pieces of twine that are equal in length. Thread one into the needle and push it down through one of the top curves of your heart. Knot well inside the piñata. Thread your needle with the other piece of twine and do the same thing on the other side of your heart. Try to make sure that both pieces are placed in approximately the same spot and centered in the top of the curve. Finally, pull up your ends so that the piñata hangs evenly and knot the twine pieces together. Trim off excess and VOILA! You are done!! Hang your piñata up somewhere so that the glue can dry, then decide how you want to haveve fun with it!

Phew! Thanks for hanging in until the end! I hope you got an amazing little surprise for your kid(s) out of it... I can't wait for mine to see their surprises!